E2E test examples with Cucumber and Nightwatch

Jovica Krstevski
Technical Lead

Aleksandra Angelovska
Quality Assurance Lead
In previous articles, we discussed “E2E development challenges and overview of the E2E testing frameworks” and “E2E Test Components”. The goal of this article is to simulate what a real user scenario looks like from start to finish and to provide E2E test examples with Cucumber and Nightwatch.
We will show real examples of our backyard project, how to set up the environment, and how to automate some of your tests.
The test includes three parts:
- Feature file, which is a clear description for each step of your test using Gherkin syntax.
- Step file, which is the script for matching the features and the Java code.
- TestRun, which is the configuration setup for running your test.
Some important things need to be taken into consideration when you configure your test-runner.ts. You need to configure it for your needs:
- Add environment option. Tests should be able to be easily rerun in any environment.
- Plan which tests to be run
- Smoke tests only?
- Specified tagged test(s)?
- Specified feature file(s)?
- Plan where tests are to be run
- Chrome in headless mode
- Browserstag
- Saucelabs
- Plan to run tests in parallel (if this is what you need)
- Set seleniumHost and seleniumPort
Writing nightwatch.conf.ts file
Take screenshots for the failed tests. This will help in debugging the failed tests.
Add option for your tests to be run on Saucelabs and Browserstack. This will help in browser compatibility testing.
Package.json
{
“name”: “api-e2e”,
“version”: “1.0.0”,
“scripts”: {
“report”: “node build/create-html-report.js”,
“prebuild”: “npm run clean”,
“build”: “tsc”,
“build:watch”: “npm run build — -w”,
“clean”: “node ./clean-up.js”,
“lint”: “tslint -c tslint.json ./src/*ts ./src/**/*ts”,
“debug”: “node –inspect-brk run-tests.js”,
“test:run”: “cucumber-js –require ./src/features/\\*\\*/*ts –require-module ts-node/register –require ./src/hooks/*.ts –format ./node_modules/cucumber-pretty ./src/features/”,
“test”: “./node_modules/.bin/ts-node src/test-runner.ts”,
“selenium:local-standalone”: “ts-node server.ts”,
“selenium:local-docker-hub”: “docker-compose up”,
“generate-report”: “ts-node ./src/create-report.ts”,
“e2e-test”: “npm test”
},
“keywords”: [ ],
“author”: “”,
“license”: “ISC”,
“devDependencies”: {
“@types/cheerio”: “^0.22.7”,
“@types/cucumber”: “^4.0.4”,
“@types/debug”: “^0.0.30″,
“@types/faker”: “^4.1.2″,
“@types/lodash”: “^4.14.115”,
“@types/node”: “^10.3.2”,
“fs-extra”: “^6.0.1”
},
“dependencies”: {
“bluebird”: “^3.5.2”,
“cheerio”: “^1.0.0-rc.2”,
“chromedriver”: “^2.40.0”,
“config”: “^1.30.0”,
“cucumber”: “^5.0.0”,
“cucumber-html-reporter”: “^4.0.1”,
“cucumber-junit”: “^1.7.1”,
“cucumber-pretty”: “^1.4.4”,
“debug”: “^3.1.0”,
“deepmerge”: “^2.1.1”,
“emailjs-imap-client”: “^3.0.7”,
“faker”: “^4.1.0”,
“fecha”: “^2.3.3”,
“geckodriver”: “^1.12.2”,
“jsonschema”: “^1.2.4”,
“lodash”: “^4.17.21”,
“nightwatch”: “^1.0.11”,
“nightwatch-api”: “^0.4.0”,
“npm-run-all”: “^4.1.5”,
“selenium-server”: “^3.12.0”,
“start-server-and-test”: “^1.7.1”,
“ts-node”: “^7.0.1”,
“typescript”: “^2.9.1”,
“wait-on”: “^3.0.1”,
“yargs”: “^11.0.0”
}
}
Create helpers for your tests
Create html report for the test results
Cucumber uses reporter plugins to produce reports that contain information about what scenarios have passed or failed. It produces pretty HTML reports that help in the visualization of failed and passed tests.
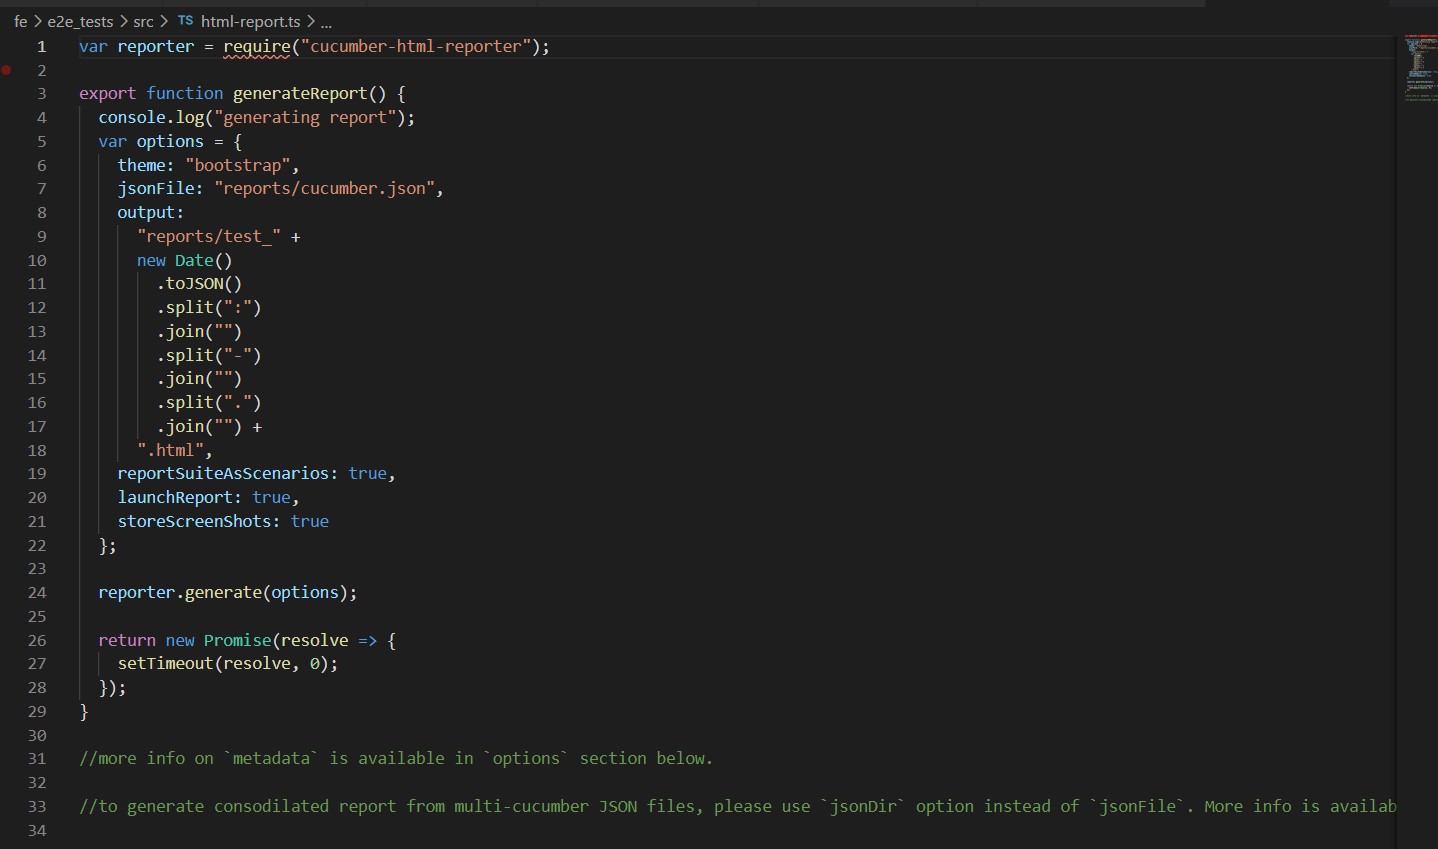
html-reports.ts
var reporter = require(“cucumber-html-reporter”);
export function generateReport( ) {
console.log(“generating report”);
var options = {
theme: “bootstrap“,
jsonFile: “reports/cucumber.json”,
output:
“reports/test_” +
new Date( )
.toJSON()
.split(“:”)
.join(“”)
.split(“-“)
.join(“”)
.split(“.”)
.join(“”) +
“.html”,
reportSuiteAsScenarios: true,
launchReport: true,
storeScreenShots: true
};
reporter.generate(options);
return new Promise(resolve => {
setTimeout(resolve, 0);
});
}
//more info on `metadata` is available in `options` section below.
//to generate consodilated report from multi-cucumber JSON files, please use `jsonDir` option instead of `jsonFile`. More info is available in `options` section below.
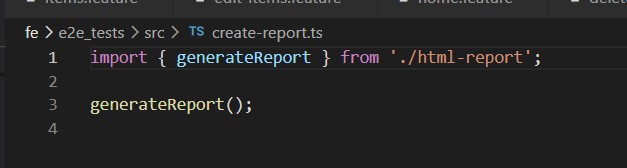
create-reports.ts
import { generateReport } from ‘./html-report’;
generateReport( );
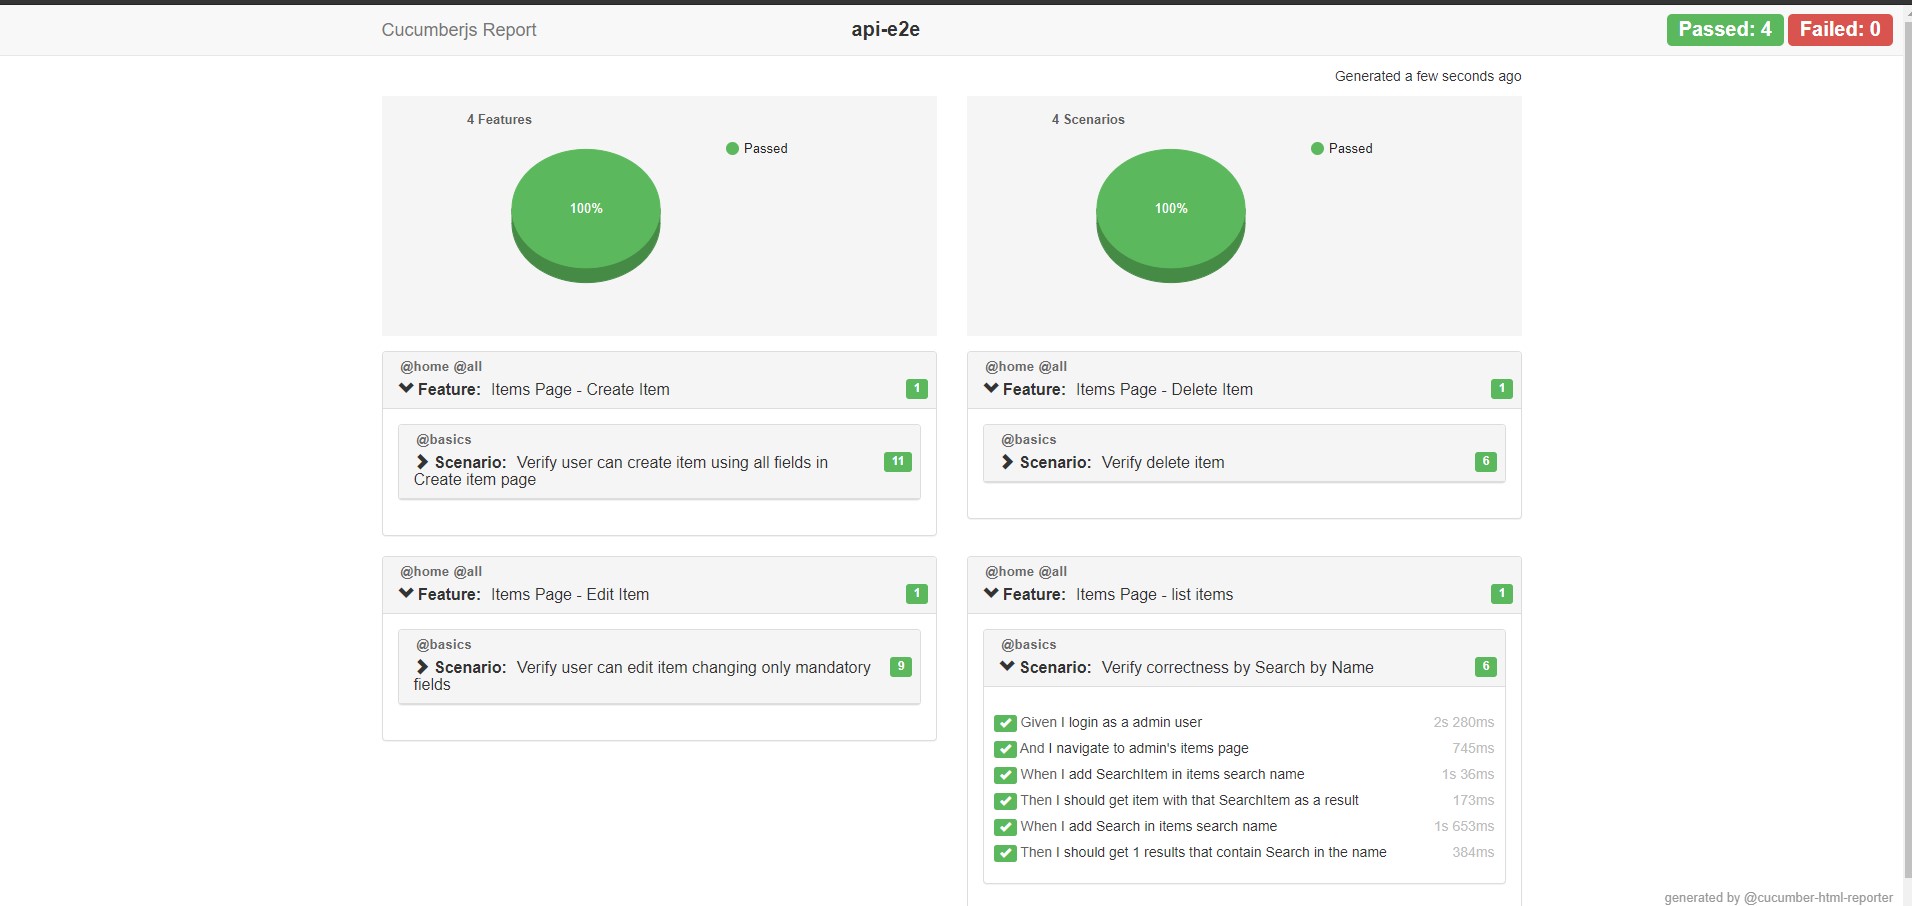
Example of reports can be found here: https://github.com/IT-Labs/backyard/tree/master/doc
E2E test examples with Cucumber and Nightwatch
In this article, we are providing examples of how we can automate some testing scenarios.
We are going to show how we implemented the following scenarios:
- User access tests
- Search list item
- Edit Item
- Create item
- Delete item
- Test empty system
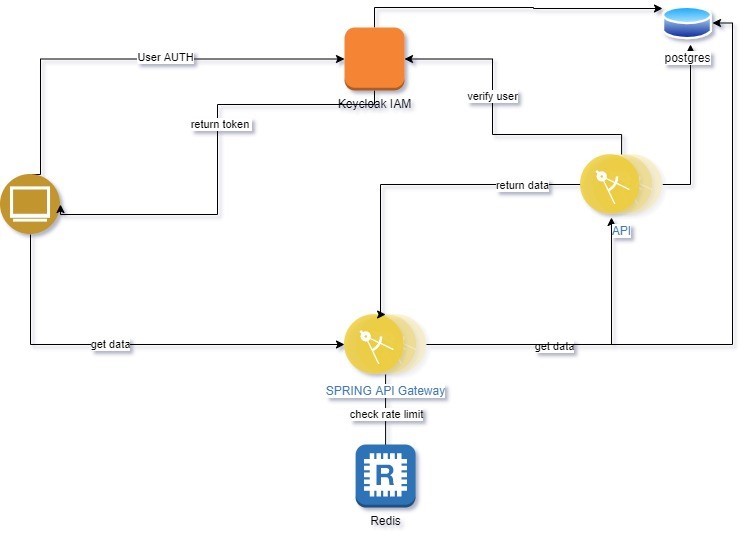
The following diagram is describing our application, where we wanted to simulate a complex application structure that depends on different services and components.
https://github.com/IT-Labs/backyard/blob/master/doc/Backyard%20arch.jpg
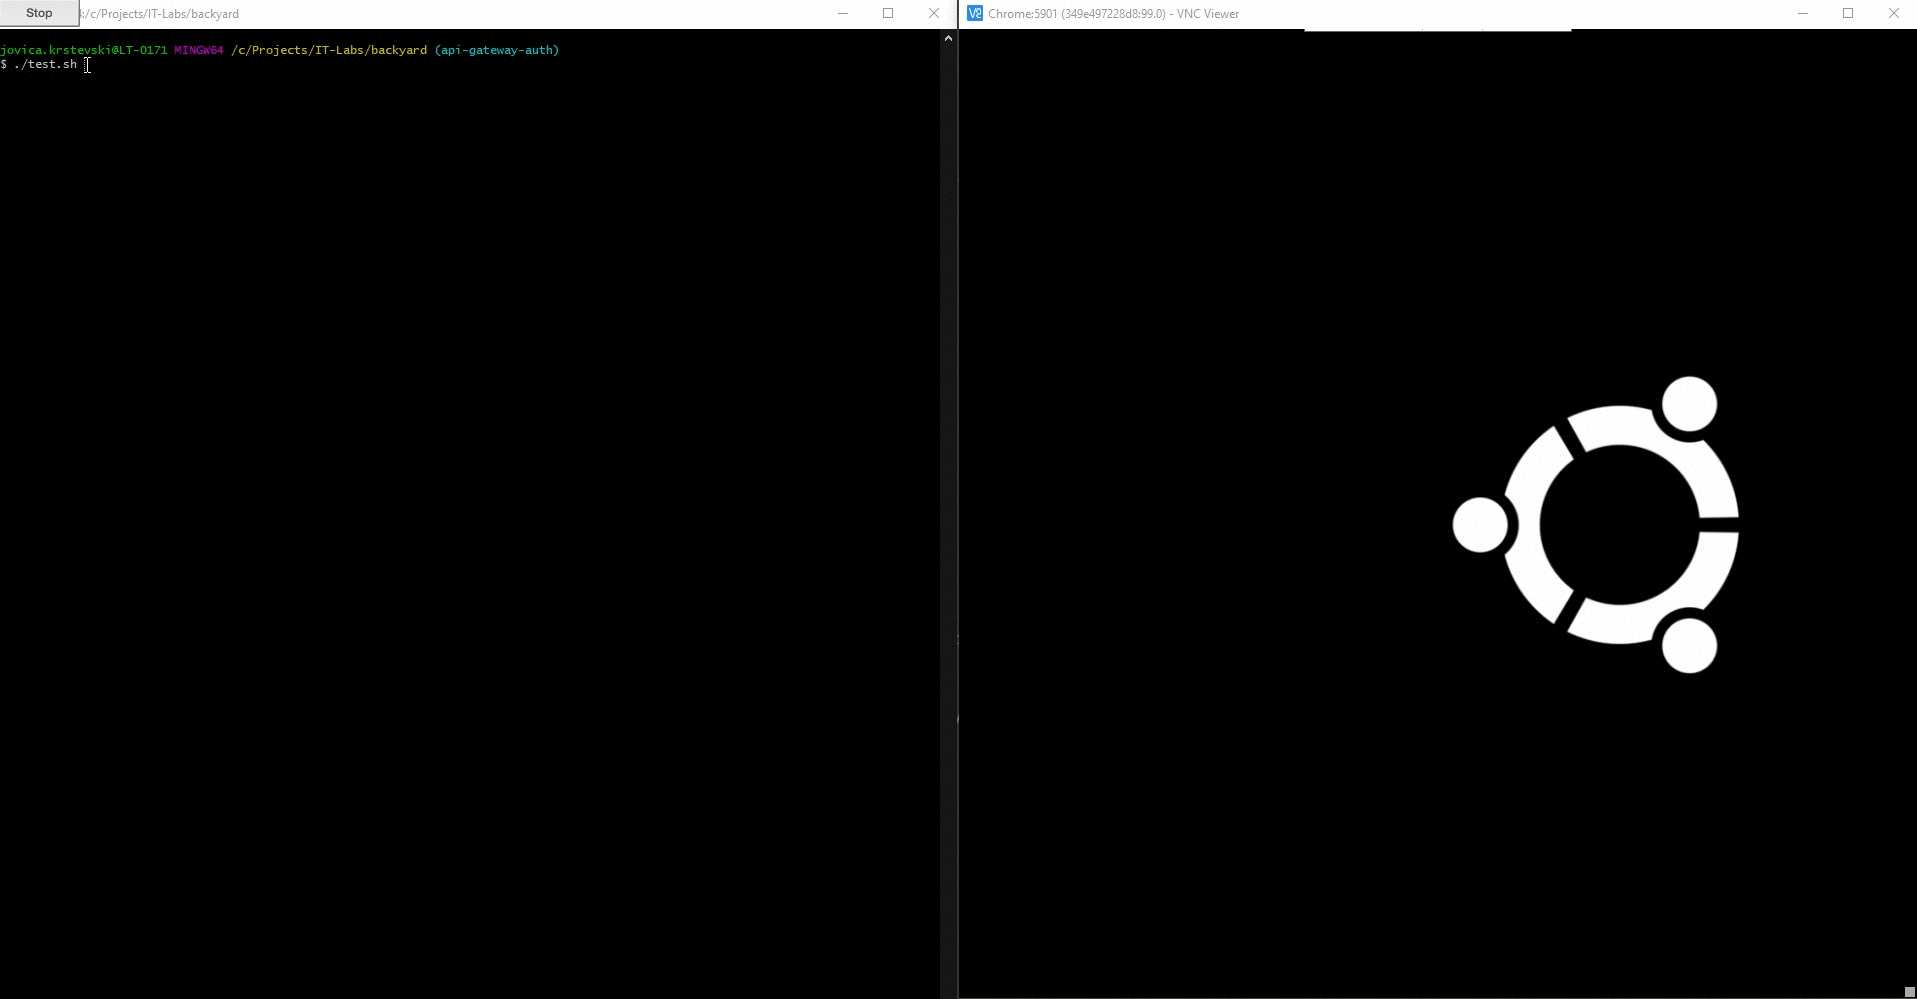
As we discussed in our previous articles, we are using dockers and volumes to run our test in repetitions. All commands are written in shell scripts for an easy start. For example, starting all applications for testing all scenarios you should only run the restart.sh file and system are ready for use, cleaning all resources you should use clean.sh.
Steps:
- Download code from https://github.com/IT-Labs/backyard
- Build the code with the script build.sh
- Start the environment with a restart.sh ./path to your local back yard folder
- Run tests with a test.sh
More details about the commands and environment you can find in the project readme file https://github.com/IT-Labs/backyard/blob/master/README.md.
Here is one example of how to run multiple tests with the previous steps:
https://raw.githubusercontent.com/IT-Labs/backyard/master/doc/TestRun.gif
User access rights
In this example system, we have two types of users: public and administrator users. For testing both scenarios we have two feature files, https://github.com/IT-Labs/backyard/blob/master/fe/e2e_tests/src/features/home/home.feature and https://github.com/IT-Labs/backyard/blob/master/fe/e2e_tests/src/features/home/home-public.feature .
Here is how gherkin is written:
Scenario Outline: Verify menu items from Home page when user is admin
Then the menu <Link> should be <isVisible>
Examples:
| Link | isVisible |
| Home | true |
| Admin | true |
| About | true |
| Hi Username | true |
| Login | false |
| Logout | true |
Code:
Then(/^the menu (.*) should be (.*)$/, function (link:string,isVisible:boolean) {
return menu.checkLinkVisibility(link, isVisible);
});
Code related to this example https://github.com/IT-Labs/backyard/blob/master/fe/e2e_tests/src/features/home/home-steps.ts , https://github.com/IT-Labs/backyard/blob/master/fe/e2e_tests/src/domain/menu/menuPage.ts
Example run: https://github.com/IT-Labs/backyard/blob/master/doc/featureHomeAdminRun.gif
Search list item
For this example, we prepare one scenario, where we are going to validate the search by name. For that purpose, our volume data has already populated data.
Code can be found here: https://github.com/IT-Labs/backyard/blob/master/fe/e2e_tests/src/features/items/items.feature
https://github.com/IT-Labs/backyard/blob/master/fe/e2e_tests/src/domain/items/itemsPage.ts
Scenario: Verify correctness by Search by Name
When I add SearchItem in items search name
Then I should get item with that SearchItem as a result
When I add Search in items search name
Then I should get 1 results that contain Search in the name
Example from the run https://raw.githubusercontent.com/IT-Labs/backyard/master/doc/SearchItem.gif
Delete item
In this example, we are presenting how we can test deletion of one item from out test environment. For that purpose, our volume data has already populated data. We must be aware that for each test run we must restore the volume from initial backup.
Code can be found here: https://github.com/IT-Labs/backyard/blob/master/fe/e2e_tests/src/features/items/delete-items.feature
https://github.com/IT-Labs/backyard/blob/master/fe/e2e_tests/src/domain/items/itemsPage.ts
Scenario: Verify delete item
When I click on Delete icon for item with name DeleteItem
Then I should see delete confirmation modal
When I click on OK on the modal
Then Item with name DeleteItem is not shown on items page
Example from the run: https://github.com/IT-Labs/backyard/blob/master/doc/DeleteItem.gif
Create item
In this example, we are presenting how we can test creating an item. For this test requirements are the item not exist in the system, and for that purpose our database before each run is restored from initial backup.
Scenario: Verify user can create item using all fields in Create item page
When I click on create button
Then I should see create item page
When I add Name SampleName
And I add Description SampleDescription
And I select Status
And I check Is Public checkbox
And click create item
Then Item should be created
And I should be redirected on list items page
Code can be found here: https://github.com/IT-Labs/backyard/blob/master/fe/e2e_tests/src/features/items/create-items.feature
https://github.com/IT-Labs/backyard/blob/master/fe/e2e_tests/src/domain/items/itemFormPage.ts
Example from the run: https://github.com/IT-Labs/backyard/blob/master/doc/CreateItem.gif
Edit item
In this example, we are presenting how we can test deletion of one item from our test environment. For that purpose, our volume data has already populated data. We must be aware that for each test run, we must restore the volume from initial backup.
Code can be found here: https://github.com/IT-Labs/backyard/blob/master/fe/e2e_tests/src/features/items/edit-items.feature
https://github.com/IT-Labs/backyard/blob/master/fe/e2e_tests/src/domain/items/itemsPage.ts
Scenario: Verify user can edit item changing only mandatory fields
When I click to edit item with name EditItem
Then I should see edit item page
When I change the Name to TestEditedItemName
And click create item
Then I should be redirected on list items page
And I add TestEditedItemName in items search name
And I should get item with that TestEditedItemName as a result
Example from the run: https://github.com/IT-Labs/backyard/blob/master/doc/EditItem.gif
Test Empty system
This is a scenario where we are verifying how the system will behave when there are no records. For that purpose, we have a separate environment where a database is without any record, and we start all service as separate instances.
Code can be found here: https://github.com/IT-Labs/backyard/blob/master/fe/e2e_tests/src/features/home/home-public.feature
https://github.com/IT-Labs/backyard/blob/master/fe/e2e_tests/src/features/home/home-steps.ts
Scenario: Verify Home page main page when there are no public published items
Then I should see message in the middle of the screen: There are no items yet!
Example from the run: https://github.com/IT-Labs/backyard/blob/master/doc/emptySystem.gif
What not to do when writing E2E tests
- Don’t Write Them Without Defining the Reason
- Automated acceptance testing (an encapsulation of customer expectations)?
- Automated regression testing (preventing regression errors)?
- Automation of smoke test flow?
- Don’t Duplicate Coverage
- If the flow can be covered with unit test, don’t write E2E test for it
- Don’t Use a Single-Layer Architecture
- Don’t Use Breakable Selectors
- Don’t Expect Your Suite to Be Maintenance-Free
- Don’t Ignore Flaky Tests
Summary
It is so important to test your software from top to bottom. E2E testing is a great way to do it — you just need to follow some rules that will implement the process properly.
When you write the tests, add a descriptive test step. A descriptive test step is helpful when a test fails, it gives them a clean and readable description of test steps (for example why this test, how it is done, etc.). Also, descriptive tests simplify the process of automation test maintenance in large projects. What’s more, having reports that will visualize and tell you which test failed and which test passed is will also help.
Since our approach implements feature files, you need to keep into consideration that the feature files can easily become very large and messy files. And running the tests — especially if they are part of some CI/CD process — can take considerable time, especially when you want to run your test in different browsers and you have large coverage.
On the other hand, large coverage is always good to have no matter the duration of the tests, because it creates greater confidence in your code.
Jovica Krstevski
Technical Lead at IT Labs
Aleksandra Angelovska
Quality Assurance Lead at IT Labs
June 2021
Introduction to Blazor

Martin Milutinovic
Back-end Engineer
What is Blazor?
Blazor is open-source cross-platform framework that lets you build interactive web UIs using C# instead of JavaScript. Blazor apps are composed of reusable web UI components implemented using C#, HTML, and CSS. Both client and server code is written in C#, allowing you to share code and libraries.
The .NET code runs inside the context of WebAssembly, running “a .NET” inside the browser on the client-side with no plugins, no Silverlight, Java, Flash, just open web standards. Blazor works in all modern web browsers, including mobile browsers. Code running in the browser executes in the same security sandbox as JavaScript frameworks. Blazor code executing on the server has the flexibility to do anything you would normally do on the server, such as connecting directly to a database.
Blazor has a separation between how it calculates UI changes (app/component model) and how those changes are applied (renderer). This sets Blazor apart from other UI frameworks such as Angular or ReactJS/React Native that can only create web technology based UIs. By using different renderers Blazor is able to create not only web based UIs, but also native mobile UIs as well. This does require components to be authored differently, so components written for web renderers can’t be used with native mobile renderers. However, the programming model is the same. Meaning once developers are familiar with it, they can create UIs using any renderer.
Blazor server-side and WebAssembly are both now shipping as part of .NET Core 3.2.0. Installing Blazor is now as simple as installing version 16.6 or later of Visual Studio, when installing, ensure you select the option ASP.NET and web development under the Workloads tab.
- Open Visual Studio
- Click Create a new project
- Select Blazor App
- Click Next
- Enter a project name
- Click Create
- Select Blazor WebAssembly App or Blazor ServerApp
- Click Create
Hosting models
Blazor is a web framework designed to run client-side in the browser on a WebAssembly-based .NET runtime (Blazor WebAssembly) or server-side in ASP.NET Core (Blazor Server). Regardless of the hosting model, the app and component models are the same.
The client-side version actually runs in the browser through Wasm and updates to the DOM are done there, while the server-side model retains a model of the DOM on the server and transmits diffs back and forth between the browser and the server using a SignalR pipeline.
Server-side hosting was released in September 2019, and Web Assembly was officially released in May, 2020.
In January 2020, Microsoft announced Blazor Mobile Bindings, an experimental project that allows developers to build native mobile apps using a combination of Blazor and a Razor variant of Xamarin.Forms (XAML).
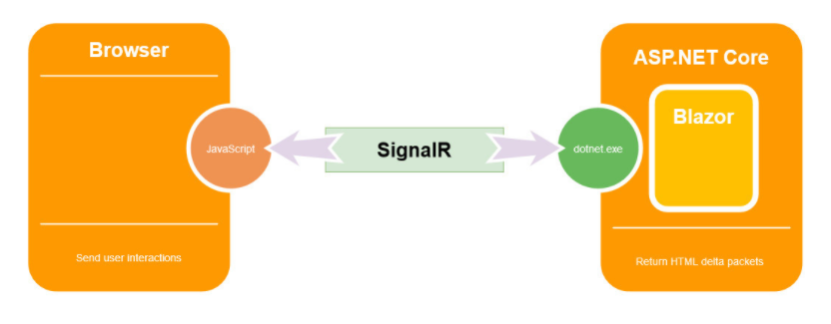
On the client, the blazor.server.js script establishes the SignalR connection with the server. The script is served to the client-side app from an embedded resource in the ASP.NET Core shared framework. The client-side app is responsible for persisting and restoring app state as required.
Blazor Server
With the Blazor Server hosting model, the app is executed on the server from within an ASP.NET Core app. UI updates, event handling, and JavaScript calls are handled over a SignalR connection.
In Blazor Server apps, the components run on the server instead of client-side in the browser. UI events that occur in the browser are sent to the server over a real-time connection. The events are dispatched to the correct component instances. The components render, and the calculated UI diff is serialized and sent to the browser where it’s applied to the DOM.
In this diagram from the docs you can see that the Razor Components are running on the Server and SignalR (over Web Sockets, etc) is remoting them and updating the DOM on the client. This doesn’t require Web Assembly on the client, the .NET code runs in the .NET Core CLR (Common Language Runtime) and has full compatibility – you can do anything you’d like as you are no longer limited by the browser’s sandbox.
- Download size is significantly smaller than a Blazor WebAssembly app, and the app loads much faster.
-
The app takes full advantage of server capabilities, including use of any .NET Core compatible APIs.
-
The app’s .NET/C# code base, including the app’s component code, isn’t served to clients.
-
Thin clients are supported. For example, Blazor Server apps work with browsers that don’t support WebAssembly and on resource-constrained devices.
-
.NET Core on the server is used to run the app, so existing .NET tooling, such as debugging, works as expected.
The downsides to the Blazor Server hosting model are:
- Higher UI latency. Every user interaction involves a network hop
- There’s no offline support. If the client connection fails, the app stops working
- Scalability is challenging for apps with many users. The server must manage multiple client connections and handle client state
- An ASP.NET Core server is required to serve the app. Serverless deployment scenarios aren’t possible. For example, you can’t serve the app from a CDN
Blazor WebAssembly
This is the hosting model that usually gets most interest, and for good reason. This model is a direct competitor to JavaScript SPAs such as Angular, VueJS, and React. Blazor WebAssembly apps execute directly in the browser on a WebAssembly-based .NET runtime. Blazor WebAssembly apps function in a similar way to front-end JavaScript frameworks like Angular or React. However, instead of writing JavaScript you write C#.
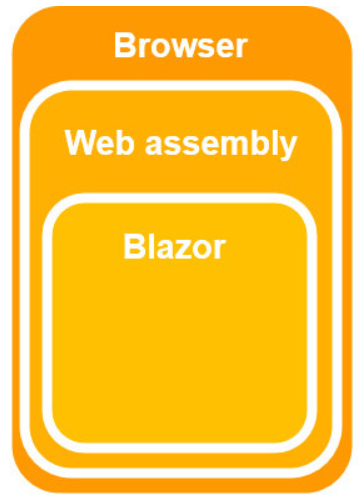
The .NET runtime is downloaded with the app along with the app assembly and any required dependencies. No browser plugins or extensions are required. The downloaded assemblies are normal .NET assemblies, like you would use in any other .NET app. Because the runtime supports .NET Standard, you can use existing .NET Standard libraries with your Blazor WebAssembly app. However, these assemblies will still execute in the browser security sandbox. A Blazor WebAssembly app can run entirely on the client without a connection to the server or we can optionally configure it to interact with the server using web API calls or SignalR.
- Downloading the .NET runtime, the app, and the app’s dependencies.
- Initialization of the runtime to run the app.
- Compiles to static files, meaning there is no need for a .NET runtime on the server
- Work is offloaded from the server to the client
- Apps can be run in an offline state
- Codesharing, C# objects can be shared between client and server easily
- The app is restricted to the capabilities of the browser
- Capable client hardware and software (for example, WebAssembly support) is required.
- Download size is larger, and apps take longer to load
- .NET runtime and tooling support is less mature. For example, limitations exist in .NET Standard support and debugging
Project structure
Program.cs
This file contains the Main() method which is the entry point for both the project types (Blazor WebAssembly and Blazor Server).
In a Blazor server project, the Main() method calls CreateHostBuilder() method which sets up the ASP.NET Core host.
In a Blazor WebAssembly project, the App component, which is the root component of the application, is specified in the Main method. This root component is present in the root project folder in App.razor file.
Startup.cs
- ConfigureServices – Configures the applications DI i.e dependency injection services. For example AddServerSideBlazor() method adds Blazor server side services. On the IServiceCollection interface there are several methods that start with the word Add. These methods add different services for the Blazor application. We can even add our own services to the DI container. We will see this in action in our upcoming videos.
- Configure – Configures the app’s request processing pipeline. Depending on what we want the Blazor application to be capable of doing we add or remove the respective middleware components from request processing pipeline. For example, UseStaticFiles() method adds the middleware component that can server static files like images, css etc.
App.razor
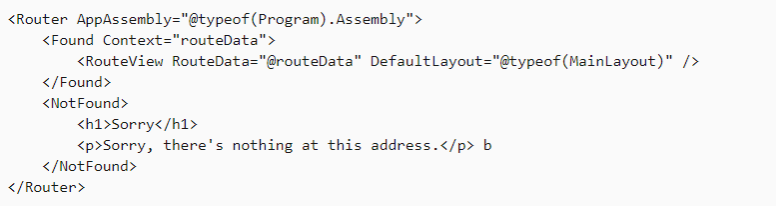
This is the root component of the application. It uses the built-in Router component and sets up client-side routing. The Router component intercepts browser navigation and renders the page that matches the requested address. The Router uses the Found property to display the content when a match is found. If a match is not found, the NotFound property is used to display the message – Sorry, there’s nothing at this address. The contents are the same for the Blazor Server and Blazor WebAssembly projects.
wwwroot
For both the project types, this folder contains the static files like images, stylesheets etc.
Pages folder
Contains the routable components/pages (.razor) that make up the Blazor app and the root Razor page of a Blazor Server app. The route for each page is specified using the @page directive.
_Host.cshtml is root page of the app implemented as a Razor Page. It is this page, that is initially served when a first request hits the application. It has the standard HTML, HEAD and BODY tags. It also specifies where the root application component, App component (App.razor) must be rendered. Finally, it also loads the blazor.server.js JavaScript file, which sets up the real-time SignalR connection between the server and the client browser. This connection is used to exchange information between the client and the server. SignalR, is a great framework for adding real-time web functionality to apps.
wwwroot/index.html
This is the root page in a Blazor WebAssembly project and is implemented as an html page. When any page of the app is initially requested, this page is rendered and returned in the response. It has the standard HTML, HEAD and BODY tags. It specifies where the root application component App.razor should be rendered. You can find this App.razor root component in the root project folder. It is included on the page as an HTML element <app>. We will discuss razor components in detail in our upcoming videos.
- Downloads the .NET runtime, the app, and the app’s dependencies
- Initializes the runtime to run the app
MainLayout.razor and NavMenu.razor
MainLayout.razor is the application’s main layout component.
NavMenu.razor implements sidebar navigation. Includes the NavLink component (NavLink), which renders navigation links to other Razor components. The NavLink component automatically indicates a selected state when its component is loaded, which helps the user understand which component is currently displayed.
Components
Blazor apps are built using components. A component is a self-contained chunk of user interface (UI), such as a page, dialog, or form. A component includes HTML markup and the processing logic required to inject data or respond to UI events. Components are flexible and lightweight. They can be nested, reused, and shared among projects. Components are implemented in Razor component files (.razor) using a combination of C# and HTML markup. A component in Blazor is formally referred to as a Razor component.
Most files in Blazor projects are .razor files. Razor is a templating language based on HTML and C# that is used to dynamically generate web UI. The .razor files define components that make up the UI of the app. For the most part, the components are identical for both the Blazor Server and Blazor WebAssembly apps. Components in Blazor are analogous to user controls in ASP.NET Web Forms.
Each Razor component file is compiled into a .NET class when the project is built. The generated class captures the component’s state, rendering logic, lifecycle methods, event handlers, and other logic. When the application is compiled, the HTML and C# code converted into a component class. The name of the generated class matches the name of the component file. A component file name must start with an uppercase character. If you add a component file that starts with a lower case character, the code will fail to compile and you get the following compiler error.
All rendered Blazor views descend from the ComponentBase class, this includes Layouts, Pages, and also Components. A Blazor page is essentially a component with a @page directive that specifies the URL the browser must navigate to in order for it to be rendered. In fact, if we compare the generated code for a component and a page there is very little difference.
- HTML markup which defines the user interface of the component i.e the look and feel.
- C# code which defines the processing logic
- Single file or mixed file approach – Html and C# code are in the same [Name].razor file and C# code is placed in @code{} block
- Partial files approach – Partial Class is a feature of implementing a single class into multiple files. Html code in in [Name].razor file and C# code in [Name].razor.cs file. [Name].razor.cs file acts as a code-behind file for [Name].razor file. While writing class in [Name].razor.cs file we explicitly mention a partial keyword, but [Name].razor Blazor file with Html Content, but .Net Compiler is good enough to read [Name].razor as a partial class, so on code compilation single [Name].cs file will be generated.
- Base class approach – ComponentBase is a class that hooked up with all component life cycles of a Blazor Component. ComponentBase class is derived from the library Microsoft.AspNetCore.Components. This approach works with the class inheritance technique. In this approach [Name].razor.cs file declares class like [Name]Base.cs which inherits ComponentBase class. Finally [Name].razor file inherits [Name]Base.cs class.
Aside from normal HTML, components can also use other components as part of their rendering logic. The syntax for using a component in Razor is similar to using a user control in an ASP.NET Web Forms app. Components are specified using an element tag that matches the type name of the component.
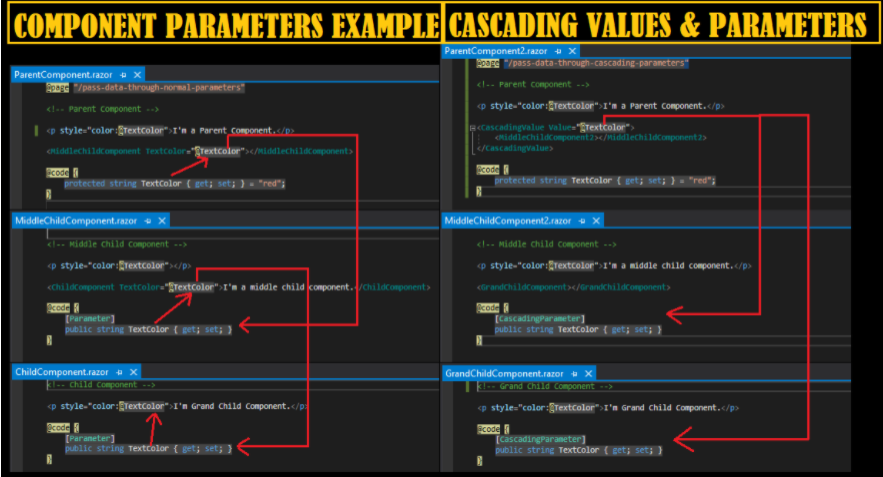
Parameters
In some scenarios, it’s inconvenient to flow data from an ancestor component to a descendent component using component parameters, especially when there are several component layers. Cascading values and parameters solve this problem by providing a convenient way for an ancestor component to provide a value to all of its descendent components. Cascading values and parameters also provide an approach for components to coordinate.
In ASP.NET Web Forms, you can flow parameters and data to controls using public properties. These properties can be set in markup using attributes or set directly in code. Blazor components work in a similar fashion, although the component properties must also be marked with the [Parameter] attribute to be considered component parameters.
Blazor has several ways to pass values from a component to its child. However, when there are several layers between the components, the best way to pass data from an ancestor component to a descendant component is by using cascading values and parameters.
The simplest way to use cascading values and parameters is by sending the value with a CascadingValue tag and getting the value from the child component with a [CascadingParameter].
Event handlers
Blazor provide an event-based programming model for handling UI events. Examples of such events include button clicks and text input. In ASP.NET Web Forms, you use HTML server controls to handle UI events exposed by the DOM, or you can handle events exposed by web server controls. The events are surfaced on the server through form post-back requests.
In Blazor, you can register handlers for DOM UI events directly using directive attributes of the form @on{event}. The {event} placeholder represents the name of the event.
Event handlers can execute synchronously or asynchronously. After an event is handled, the component is rendered to account for any component state changes. With asynchronous event handlers, the component is rendered immediately after the handler execution completes. The component is rendered again after the asynchronous Task completes. This asynchronous execution mode provides an opportunity to render some appropriate UI while the asynchronous Task is still in progress.
Components can also define their own events by defining a component parameter of type EventCallback<TValue>. Event callbacks support all the variations of DOM UI event handlers: optional arguments, synchronous or asynchronous, method groups, or lambda expressions.
Data binding
Blazor provides a simple mechanism to bind data from a UI component to the component’s state. This approach differs from the features in ASP.NET Web Forms for binding data from data sources to UI controls.
One-way binding
One-way data binding is also known as an interpolation in other frameworks, such as Angular. It have a unidirectional flow, meaning that updates to the value only flow one way. It is very similar to Razor and also it will be quite straightforward. In one-way binding, we need to pass property or variable name along with @.
In Blazor, when modifying a one way binding the application is going to be responsible for making the change. This could be in response to user action or event such as a button click. The point being, that the user will never be able to modify the value directly, hence one way binding.
Two-way binding
Blazor also supports two-way data binding by using bind attribute. The primary use case for two way binding is in forms, although it can be used anywhere that an application requires input from the user.
Razor rewrites the @bind directive to set the property Value and add an event handler for ValueChanged. Setting Value defines the original value for the child component. When the value is changed in the child component, it notifies the parent using the ValueChanged callback. The parent component can update the value of the Age property.
Component libraries
Radzen Blazor Components
- Site: https://razor.radzen.com/
- Pricing: Free for commercial use
- Blazor Server: Yes
- Blazor WebAssembly: Yes
MudBlazor
- Site: https://mudblazor.com/
- Pricing: free
- Blazor Server: Yes
- Blazor WebAssembly: Yes
MatBlazor
- Site: https://www.matblazor.com/
- Pricing: free
- Blazor Server: Yes
- Blazor WebAssembly: Yes
DevExpress Blazor Components
- Site: https://www.devexpress.com/blazor/
- Pricing: Free “for a limited time”
- Blazor Server: Yes
- Blazor WebAssembly: Yes
SyncFusion Blazor UI Components
- Site: https://blazor.syncfusion.com/
- Pricing: Free community license or $995 /developer 1st year
- Blazor Server: Yes
- Blazor WebAssembly: Yes
Telerik UI for Blazor
- Site: https://www.telerik.com/blazor-ui
- Pricing: $899/developer perpetual license
- Blazor Server: Yes
- Blazor WebAssembly: Yes
Pages
In Blazor, each page in the app is a component, typically defined in a .razor file, with one or more specified routes. To create a page in Blazor, create a component and add the @page Razor directive to specify the route for the component. The @page directive takes a single parameter, which is the route template to add to that component.
The route template parameter is required and are specified in the template using braces. Blazor will bind route values to component parameters with the same name (case-insensitive).
Components in Blazor, including pages, can’t render <script> tags. This rendering restriction exists because <script> tags get loaded once and then can’t be changed. Unexpected behavior may occur if you try to render the tags dynamically using Razor syntax. Instead, all <script> tags should be added to the app’s host page.
Layouts
A Blazor layout is similar to the ASP Webforms concept of a Master Page, and the same as a Razor layout in ASP MVC.
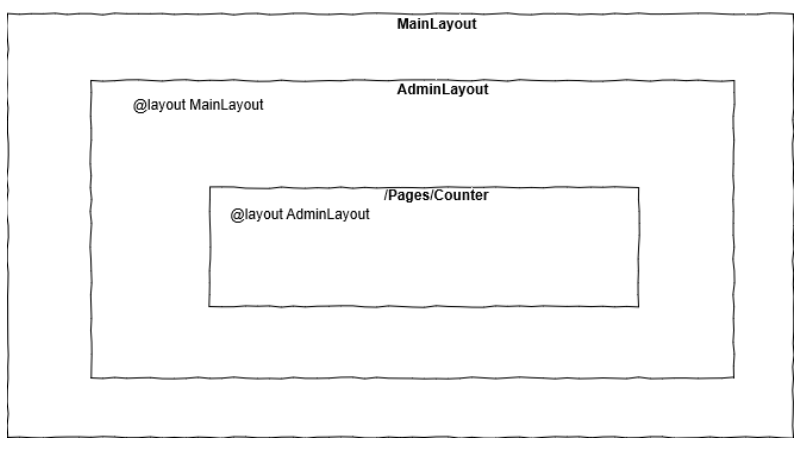
In Blazor, you handle page layout using layout components. Layout components inherit from LayoutComponentBase, which defines a single Body property of type RenderFragment, which can be used to render the contents of the page. When the page with a layout is rendered, the page is rendered within the contents of the specified layout at the location where the layout renders its Body property. You can specify the layout for all components in a folder and subfolders using an _Imports.razor file. You can also specify a default layout for all your pages using the Router component.
When specifying a @layout (either explicitly or through a _Imports.razor file), Blazor will decorate the generated target class with a LayoutAttribute. Blazor will honour a LayoutAttribute on any ComponentBase descendant. Not only do pages descend from this class, but the LayoutComponentBase does too! This means that a custom layout can also have its own parent layout.
Layouts in Blazor don’t typically define the root HTML elements for a page (<html>, <body>, <head>, and so on). The root HTML elements are instead defined in a Blazor app’s host page, which is used to render the initial HTML content for the app (see Bootstrap Blazor). The host page can render multiple root components for the app with surrounding markup.
Routing
Routing in Blazor is handled by the Router component. The Router component is typically used in the app’s root component (App.razor). The Router component discovers the routable components in the specified AppAssembly and in the optionally specified AdditionalAssemblies. When the browser navigates, the Router intercepts the navigation and renders the contents of its Found parameter with the extracted RouteData if a route matches the address, otherwise the Router renders its NotFound parameter. The RouteView component handles rendering the matched component specified by the RouteData with its layout if it has one. If the matched component doesn’t have a layout, then the optionally specified DefaultLayout is used.
Routing mostly happens client-side without involving a specific server request. The browser first makes a request to the root address of the app. A root Router component in the Blazor app then handles intercepting navigation requests and them to the correct component. Blazor also supports deep linking. Deep linking occurs when the browser makes a request to a specific route other than the root of the app. Requests for deep links sent to the server are routed to the Blazor app, which then routes the request client-side to the correct component.
State management
For the best possible user experience, it’s important to provide a consistent experience to the end user when their connection is temporarily lost and when they refresh or navigate back to the page. The components of this experience include:
- The HTML Document Object Model (DOM) that represents the user interface (UI)
- The fields and properties representing the data being input and/or output on the page
- The state of registered services that are running as part of code for the page
In the absence of any special code, state is maintained in two places depending on the Blazor hosting model. For Blazor WebAssembly (client-side) apps, state is held in browser memory until the user refreshes or navigates away from the page. In Blazor Server apps, state is held in special “buckets” allocated to each client session known as circuits. These circuits can lose state when they time out after a disconnection and may be obliterated even during an active connection when the server is under memory pressure.
Generally, maintain state across browser sessions where users are actively creating data, not simply reading data that already exists. To preserve state across browser sessions, the app must persist the data to some other storage location than the browser’s memory. State persistence isn’t automatic. You must take steps when developing the app to implement stateful data persistence.
Data persistence is typically only required for high-value state that users expended effort to create. In the following examples, persisting state either saves time or aids in commercial activities:
Multi-step web forms: It’s time-consuming for a user to re-enter data for several completed steps of a multi-step web form if their state is lost. A user loses state in this scenario if they navigate away from the form and return later.
Shopping carts: Any commercially important component of an app that represents potential revenue can be maintained. A user who loses their state, and thus their shopping cart, may purchase fewer products or services when they return to the site later.
An app can only persist app state. UIs can’t be persisted, such as component instances and their render trees. Components and render trees aren’t generally serializable. To persist UI state, such as the expanded nodes of a tree view control, the app must use custom code to model the behavior of the UI state as serializable app state.
Dependency injection
Dependency injection is a best-practice software development technique for ensuring classes remain loosely coupled and making unit testing easier. The Blazor supports Dependency injection in both the Blazor server and Blazor WebAssembly app. The Blazor provides built-in services, and you can also build a custom service and use it with a component by injecting them via DI.
- Singleton – DI creates a single instance of the service. All components requiring this service receive a reference to this instance.
- Transient – Whenever a component requires this service, it receives a new instance of the service.
- Scoped – This is means the service is scoped to the connection. This is the preferred way to handle per user services – there is no concept of scope services in WebAssembly as obviously it’s a client technology at this point and already per user scoped
JavaScript interoperability
A Blazor app can invoke JavaScript functions from .NET methods and .NET methods from JavaScript functions. These scenarios are called JavaScript interoperability (JS interop). JavaScript should be added into either /Pages/_Host.cshtml in Server-side Blazor apps, or in wwwroot/index.html for Web Assembly Blazor apps. Our JavaScript can then be invoked from Blazor by injecting the IJSRuntime service into our component.
To call into JavaScript from .NET, use the IJSRuntime abstraction. To issue JS interop calls, inject the IJSRuntime abstraction in your component. InvokeAsync takes an identifier for the JavaScript function that you wish to invoke along with any number of JSON-serializable arguments. The function identifier is relative to the global scope (window). If you wish to call window.someScope.someFunction, the identifier is someScope.someFunction. There’s no need to register the function before it’s called. The return type T must also be JSON serializable. T should match the .NET type that best maps to the JSON type returned.
For Blazor Server apps with prerendering enabled, calling into JavaScript isn’t possible during the initial prerendering. JavaScript interop calls must be deferred until after the connection with the browser is established.
Conclusion
- Project structure
- Hosting models
- Components
- Blazor pages and layouts
- Routing
- State management
- Dependency injection
- JavaScript interoperability
For more details and examples can check links in References section.
Blazor is certainly worth picking up for new projects because is a new technology and from Microsoft says that they will continue to invest in it. Blazor is certainly worth picking up for new projects. I think that even though the framework is not yet fully mature it has come far from short lifespan, and that even though Blazor is not widely used yet it is unlikely to go away considering that it is developed and supported by a large company like Microsoft.
I think that Blazor is interesting for back-end developers because they can develop UI using C#, that is more intuitive for them them unlike some UI framework such as Angular.
References
- https://docs.microsoft.com/en-us/dotnet/architecture/blazor-for-web-forms-developers/introduction
- https://blazor-university.com/
- https://www.pragimtech.com/blog/blazor/what-is-blazor/
- https://docs.microsoft.com/en-us/aspnet/core/blazor/?view=aspnetcore-5.0
- https://github.com/AdrienTorris/awesome-blazor
- https://github.com/SteveSandersonMS
- https://www.youtube.com/user/IAmTimCorey/search?query=blazor
- www. youtube.com/playlist?list=PLSIKM6F-xklKaf0lPlphuIqZgZrmWhmfj
- https://www. youtube.com/watch?v=zjlUstW7ISU
- https://www.youtube.com/c/CuriousDrive/playlists
- https://blazor-tutorial.net/
- https://www.youtube.com/watch?v=zjlUstW7ISU
- https://jonhilton.net/blazor-state-management/
- https://blog.jeremylikness.com/blog/blazor-state-management/
Martin Milutinovic
Back-end Engineer
June 2021
BA & QA synergistic approach: Testing software requirements

Daniela Zdravkovska
Business Analyst
In our company, high-performing teams are essential in achieving excellence in software development. A software’s performance on the other side, is built on good specifications & project requirements and BAs have their crucial role in defining them. Their task is to collect specifications from all stakeholders to ensure that the proposed software solution meets all of their requirements. Working on the requirements is a model that is built a bit ahead from the development with customer’s consent and active participation in the requirements elicitation phase. BAs work in advance on the scope definition on a project or on a sprint level, presenting them the business scope to the development team that is about to start working on the implementation. So, what does BAs have to do with QAs? The answer is simple: ensuring the solution meets the business requirements! They both test the workable pieces of software that are deployed as well as the final product making sure there is a match between the client’s expectations & needs and the actual result which is about to be delivered on the other side (BA side) and that what delivered to the customer corresponds to what defined in the business requirements documentation (QA side). Although there seem to be two different sides of the story or better said, different approaches to the same thing, still the purpose is the same: making sure that a high-quality software is developed according to the business requirements from the customer.
Requirements & Tests
Tests and requirements may sound different, but they both complement the view of the system that is built. Multiple views of a system—written requirements, diagrams, prototypes, and so on—provide a far richer interpretation of the system than a single representation would. The agile practices show a preference towards writing user acceptance tests, rather than detailed functional requirements. Writing detailed functional requirements accompanied by UAT provides a crystallized understanding of how the system should behave so that the project scope is met and value delivered to the customer and their end-users. When BAs, developers, and customers walk through tests together, they codify a common vision of how the product will function and boost their trust that the specifications are right. Given that many business analysts end up designing parts of the user interface, including them in usability testing is always a good idea. This is where the synergetic approach between BAs and QAs comes into place.

Good requirements are those that are testable
The most important step in solving every problem is to test the proposed solution. As a result, the tested outcomes are seen as a critical project success factor. We must first consider how “testing” fits into the overall picture of device creation lifecycles before we can begin dissecting it. Understanding the business logic means understanding the software’s requirements. As such, when gathering them and during the requirements elicitation phase, we as BAs need to know what good requirements are. Among their correctness, feasibility, clearness, and unambiguity, making sure that every requirement meets a specific business need that can be tested is crucial and it requires a specific criterion against which it can be validated. Requirements meeting the acceptance criteria are essential in avoiding conflicts between the stakeholders or unhappy customers. It turns out that acceptance criteria are kind of an agreement between all the parties. For instance, let’s consider the following requirement: “The system shall be user-friendly”. Fancy as it may sound, the aforementioned statement does not provide a clear and verifiable criterion of what user-friendliness is. We would not know whether to “pass” or “fail” this requirement simply because we miss the criteria against which we can test it! Instead of it, during the elicitation of this requirement, we could establish that the system will provide help screens, dialog boxes, easy menu-driven navigation, etc. Having this in mind, we can understand how important it is for all requirements to be testable.
BA role in different types of testing
Software testing happens at several stages during the implementation of a project. In some of them, the Business Analyst is directly involved, while in others, they are available to clarify requirements.
Integration Testing
During the integration testing, BAs act as support here providing guidance and answering questions that the developers may have.
System Testing
Considering that system testing is about making sure that the system as a whole works according to the specified requirements, the role of the BAs is more engaging. BAs are actively involved in making sure that each component works as per the specifications and that their integration corresponds to the business logic. Consequently, they can get involved in:
- Writing test plans
- Creating and executing test cases
- Review the test cases prepared by the QAs
- Provide guidance and make adjustments where needed according to the outcomes

Regression Testing
Changes in the business requirements mean also changes in the coding, therefore a regression testing is needed to ensure the software meets the business requirements after the modifications. Regression testing is something that a Business Analyst is well-versed in. As BAs, we can choose which important test cases to include in a Regression suite to ensure that all functionality remain intact after a code update.
User Acceptance Testing- UAT
User Acceptance Testing (UAT) is the process of testing an application by users who may be industry subject matter experts or end users to ensure that it meets the intended business needs as well as stakeholder and solution criteria. User Acceptance Testing is perhaps the most critical testing activity, and project managers, company sponsors, and users are all interested in it. This is because UAT is performed on product-like scenarios and environments with potentially real business data, and passing UAT tests indicates that the solution meets the business and solution criteria and is ready for deployment. A business analyst may play a variety of roles in User Acceptance testing, including (but not limited to) the activities mentioned below.
- Carry out customer acceptance testing on behalf of business end users.
- Assist in the creation of UAT test cases that cover the most important market situations and use cases.
- Work along with the software testers to ensure software compliance with the business logic and requirements.
Role-based access Testing
Building tests for role-based security, which restricts user access based on their login, can be one of the most challenging test scenarios. The Roles & Permissions matrix defined by the BAs ensures the integrity of often sensitive information therefore when defining it, BAs usually do the following:
- Identify the key roles within the system
- Discover additional roles that require access to the system
- Discover roles that should not have access to certain system functions and
- Denote who can perform which activities/tasks within the system
Although when writing the business requirements documentation or the subsequent user stories the users’ roles & permissions are clearly to be identified, still testing them out separately is a good approach to ensure that the system works as supposed to. Role-based security testing guarantees that the program enforces user roles, so defining these roles and rights is a natural starting point for the testing process. Upon their definition and successful implementation, checking that they work as intended is essential in avoiding high fault rates or even security breaches. BAs take an important stance in this regard ensuring that not only the business logic is captured, but also that the system provides or restricts the access based on the defined role within the system. System-wise, QAs will be interested to make sure that the system behaves as expected according to the business requirements, while the BAs ensure that the requirements are developed keeping in mind the roles & permissions limits or constraints.
Writing conceptual tests
As mentioned above, writing test cases can also be a part of the business analyst role. In the early development process, BAs can start deriving conceptual tests from the business requirements which later on in the development stages can be used to evaluate functional and non-functional requirements, business models, and prototypes. BA tests normally cover the normal flows of each use case, alternative flows (if any), exceptions, or constraints identified during the requirements elicitation phase. What’s important is for the test to cover both expected behaviors and outcomes, and the exceptions on the other side. Let’s discuss an example I believe we are all familiar with. Consider an application for making reservations similar to Booking. Conceptual tests here would include:
- The User enters the confirmation number to find the booked reservation. Expected result: system shows the reservation details (time, check-in and check-out date, included services, the price paid, etc.)
- The User enters the confirmation number to find the booked reservation, the order does not exist. Expected result: “Sorry, we were unable to find your reservation”.
- The User enters a confirmation number to find the booked reservation. No reservation has been booked. Expected result: “There does not seem to be a reservation made with the details you provided. Please double-check the information you entered or contact us at support@example.com”.
Having this in mind, both BA and QA will work together to define test scenarios. Inconsistencies between the views expressed by the functional specifications, templates, and tests can result from ambiguous user requirements and differing interpretations. While developers convert specifications into the user interface and technological designs, BAs and QAs work together on transforming conceptual requirements into verifiable test scenarios and procedures.
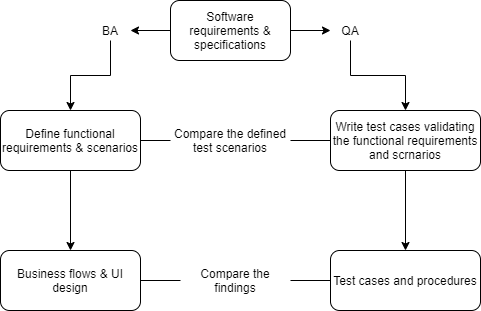
As we can see in the above diagram, testing the business requirements requires a common approach both from the BAs and the QAs.
The testing
Following up the previously mentioned example diagram, here is how a test example would look like. The testing process combines a common understanding of the business requirements.
Use case
In the aforementioned example, a use case would be “checking/finding an already made reservation”. The path included in this process allows the users to search through a certain database where the specific reservation is stored.
Description:
- The end-user enters the previously received confirmation number in a reservation search system.
- The system offers a search field from where the end-user will be able to find the reservation or make a new one.
Functional requirement
- If the system contains the searched reservation, then it should display it.
- The user shall select to open the found reservation, if any, or create a new one.
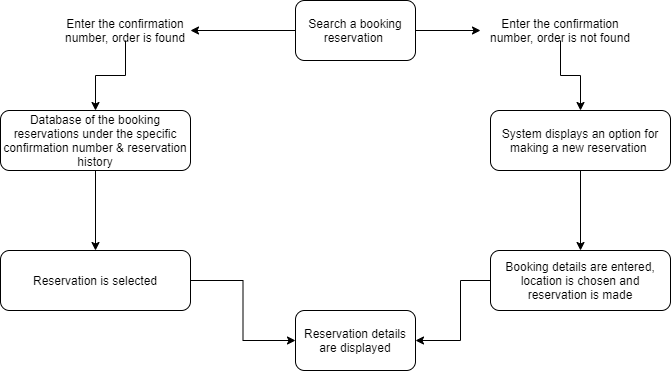
Based on the diagram, we can see that the abovementioned use case has several possible execution paths, therefore it makes sense to compose several test plans, especially if we keep in mind the exceptions. At this point, usually, BA tests are more on a high level because they intent to cover the business logic scenarios. As we move with the development phase, QAs will work on making more specific test cases including all aspects of both positive and negative scenarios. Testing these requirements means making sure execution is possible by going through every requirement. The easiest way for both BAs and QAs is to visually draw an execution line that will make obvious the incorrect or the missing part, so the process can be improved, and the test refined. This way of approaching the testing and the combined effort between the BAs and the QAs allows to avoid missing parts or to remove redundant requirements before a code is written.
Conclusions
Although a joint effort is required, still BAs gather the requirements first. Since assigned project testers are seldom present during the gathering of business specifications, test data must be produced and recorded consistently for the assigned testers. This strategy would make it easier for testers to complete their assignments and for business analysts and project managers to coordinate such research. In reality, before a QA joins the team, BAs need to collaborate with the tech people on the project to develop the test scenarios ensuring their validity and traceability before they are provided to the dedicated QAs. This way, they don’t need to revalidate test data that do not correspond with the exact business requirements. Although testing is something that BAs and QAs have in common, yet there is one crucial difference: UAT primary purpose is to define that the system fits the business logic and that it serves both the customer and the end-users, while the system testing purpose is to make sure the software behaves the way it is supposed to according to the defined business requirements. In the end, we can just confirm that good software is based on a collaborative approach of all involved parties in its development cycle, while conceptual testing remains a powerful way for discovering requirements gaps and ambiguities and solve them!
Daniela Zdravkovska
Business Analyst
June 2021
Is Creativity Crucial In Today’s Business Environment?

Risto Ristov
Project Coordinator & Content Editor

Creativity is more than just art
People are not used to the topics of creativity and business in the same conversation. A lot of people out there believe that business is purely financial and about making money, while creativity is more of an artistic value. Yes, an artist should be creative and share creativity with the world, but so should a software engineer in order to build rational and sustainable solutions, a mathematician to solve the hardest math problem , a salesperson to attract perspective clients, or a CEO to lead a company in the right direction.
Creativity is a crucial factor in today’s business environment because it represents a way of thinking that can inspire, challenge, help people to solve existing problems and find innovative solutions. It’s the source of inspiration and innovation. Simply put, it is solving problems in original ways.
Creative people in companies
Creative people are needed across every industry and every function more than you think. Software companies don’t just want someone who can write code, they want someone who can dream up new solutions to fix old problems. Companies don’t want business analysts who just crunch numbers; they want analysts who can think of creative solutions based on what the numbers are telling them. People need to think “out of the box” and bring progress and value to their projects and ultimately to their company.
If we want to steer our career in the right direction, there’s no better approach than focusing on thinking more creatively. We should stop using solutions that worked previously and push ourselves to think of newer, better ideas, ideas that could bring better performance.
Business
There is no business or project that had great success without any creative or innovative ideas being implemented. Creativity is one of the most important reasons why businesses can thrive in a world of “big” technology-sustainable ideas. In today’s challenging and groundbreaking technology market, creative business ideas set companies apart from one another. Without creativity, we might be going around in circles and doing the same things, over and over again. What kind of a fun world and competition would that be? Where would progress be? What would set us apart?
Top 10 skills
The World Economic Forum placed creativity in top 3 required skills to run a business in 2020.
in 2015
- Complex Problem Solving
- Coordination with Others
- People Management
- Critical Thinking
- Negotiation
- Quality Control
- Service Orientation
- Judgment and Decision Making
- Active Listening
- Creativity
in 2020
- Complex Problem Solving
- Critical Thinking
- Creativity
- People Management
- Coordinating with Others
- Emotional Intelligence
- Judgment and Decision Making
- Service Orientation
- Negotiation
- Cognitive Flexibility

Source: Future of Jobs Report, World Economic Forum
In 2015, creativity was in the top ten skills but it was placed in 10th place. In 2020, the World Economic Forum placed it in 3rd place. According to their research, more companies are starting to realize how important creativity is to their overall business success.
What does creativity brings to a business?
- Competitiveness
- Improves company culture
- Increases productivity
- Solves problems
- Brings Innovative solutions that can change the world
Every company tries to grow and expand while surpassing the competition. It is crucial to bring some new ideas, something different, something helpful to your customers in order to achieve greater value. If you simply copy what other businesses do, you can’t expect to become the best in the industry. You need to innovate, come up with the best rational solutions, and push the boundaries of what is really possible out there.
There is no dumb idea
Every idea during a creative process has merit. Whether or not the idea sounds good, or is laid out perfectly, it can be worked and modified and morphed into absolute brilliance. People should stop being so critical of their inner geniuses. There should be no restriction to dumb ideas from reaching their potential. When an idea pops up in our minds, let’s not right away say that it is a dumb one. Rather, communicate it with the team and work your way around it, shape it into the best possible solution and the results can be nothing short of extraordinary in the long run.

Creativity can be found in environments that are prone towards adaptability, flexibility, environments that are based on trust, respect, who welcome new ideas, experiments and encourage people to be curious and explore.
There is no business without its people behind it. Companies need to find smarter ways to attract new clients and to keep the interest of the existing ones. This is why nurturing creativity within employees which often goes together with problem-solving, can create opportunities and overcome challenges. With a mindset of growth and curiosity, companies can become the best version of themselves and a catalyst for innovations, therefore, offering greater value.
Exploration is very tightly related to creativity and even though it sounds exciting, it is still not an easy task. You get to explore something new, something that you haven’t seen so far. You get to play with your idea, share it with others, and possibly shape it to the best version you can think of. There should be no pressure into delivering results right away. Innovation takes time but waiting for it is totally worth it.
Productivity Boost
A major benefit of creativity is that it helps boost productivity. It will bring a feeling of belonging, a feeling of creating something new, something innovative. It will make people feel appreciated, and with that kind of motivation at hand, we can expect for them to surpass the limits and the expectations. This doesn’t mean that people are not susceptible to make mistakes, but it means that when mistakes happen, it will be easier to accept them and understand feedback about it at the highest level.
Despite what you have thought before, creativity is a skill. And just like other skills, it can be developed and nurtured if everyone works on it.
In the very end, I will say this, step out of your comfort zone, explore new solutions, and stimulate creativity. The world is up to you to change it. Dream big because in terms of technology, anything is possible if we just get our minds into it.
Risto Ristov
Project Coordinator & Content Editor
May 2021
Provisioned Concurrency for AWS Lambda functions
AWS Provisioned concurrency – why use it

Elvira Sorko
Senior Back End Engineer at IT Labs
In my company, we’ve recently been working on a serverless project that is using AWS Lambda functions for backend execution of REST API Gateway. But with Lambda functions, cold starts were our greatest concern. Generally, our Lambda functions are written with Java and .NET, which often experience cold starts that last for several seconds! Reading different articles, we found that this was a concern for many others in the serverless community. However, AWS has heard the concerns and has provided the means to solve the problem. AWS in 2019 announced Provisioned Concurrency, a feature that allow Lambda customers to not have to worry about cold starts anymore.
So, if you have Lambda function and just deployed as a serverless service, or if it has not been invoked in some time, your function will be cold. This means that when you invoke a Lambda function, the invocation is routed to an execution environment to process the request. If a new event trigger did occur to invoke a Lambda function, or the function has not been used for some time, a new execution environment would need to be instantiated, the runtime loaded in, your code and all of its dependencies imported and finally your code executed. Depending on the size of your deployment package, and the initialization time of the runtime and of your code, this process could take more seconds before any execution actually started. This latency is usually referred to as a “cold start”, and you can monitor it in the X-Ray as initialization time. However, after execution, this micro VM that took some time to spin up is kept available afterwards for anywhere up to an hour and if a new event trigger comes in, then execution could begin immediately.

Our first try to prevent cold starts, was to use warm-up plugin Thundra (https://github.com/thundra-io/thundra-lambda-warmup). Usage of this warm-up plugin in our Lambda functions requires implementing some branching logic that determines whether this was a warm–up execution or an actual execution. However, while the warm-up plugin didn’t cost anything, except the time spent on implementation in our existing Lambda functions code, the results were not satisfactory.
Then we decided to set aside a certain budget, as AWS services costs money, and use the AWS feature Provisioned Concurrency. As the AWS documentation says, this is a feature that keeps functions initialized and hyper-ready to respond in double-digit milliseconds. It works for all Lambda runtimes and requires no code change to existing functions. Great! That’s what we needed.
How it works
When you enable Provisioned Concurrency for a function, the Lambda service will initialize the requested number of execution environments so they can be ready to respond to invocations. With provisioned concurrency, the worker nodes will reside in the state with your code downloaded and underlying container structure all set. So, if you expect spikes in traffic, it’s good for you to provision a higher number of worker nodes. If we have more incoming invocations and provisioned worker nodes can’t satisfy these requests, then the overflow invocations are handled conventionally with on-demand worker nodes being initialized per the request.
It is important to know that you pay for the amount of concurrency that you configure and for the period of time that you configure it. When Provisioned Concurrency is enabled for your function and you execute it, you also pay for Requests and Duration based on the prices in the AWS documentation. If the concurrency for your function exceeds the configured concurrency, you will be billed for executing the excess functions at the rate outlined in the AWS Lambda Pricing section.
The Lambda free tier does not apply to functions that have Provisioned Concurrency enabled. If you enable Provisioned Concurrency for your function and execute it, you will be charged for Requests and Duration.
Configuring Provisioned Concurrency
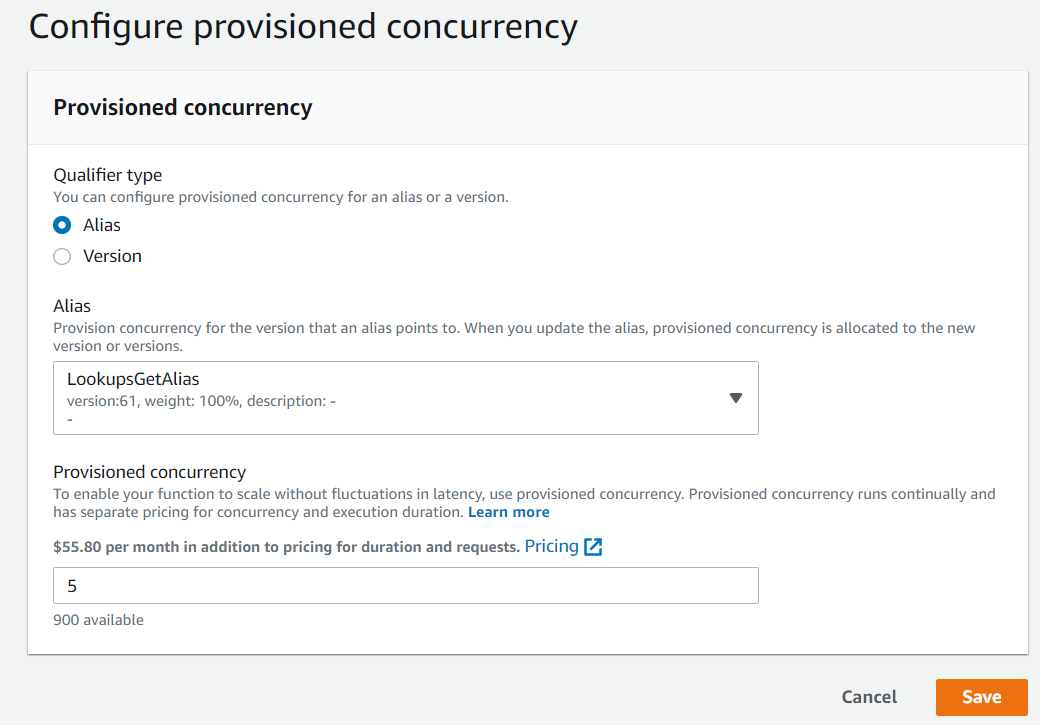
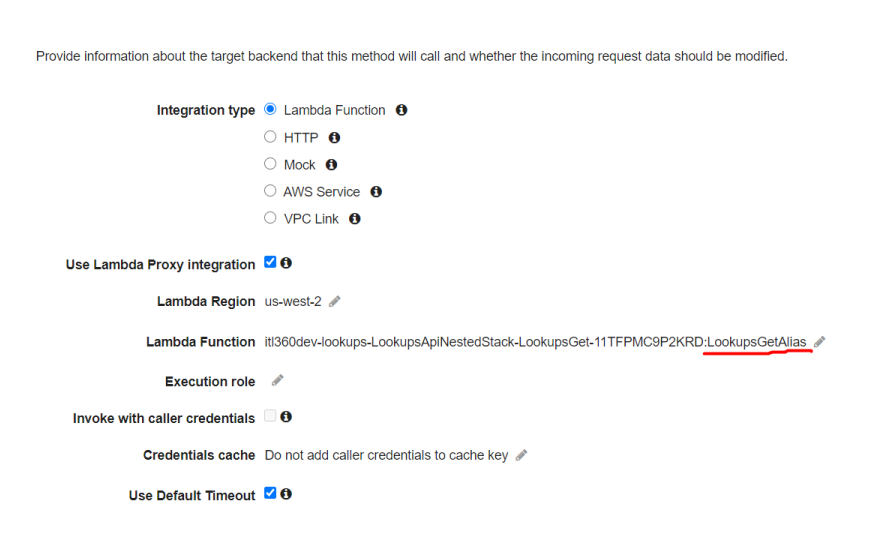
It is important to know that Provisioned concurrency can be configured ONLY on Lambda Function ALIAS or VERSION. You can’t configure it against the $LATEST alias, nor any alias that points to $LATEST.
Provisioned Concurrency can be enabled, disabled and adjusted on the fly using the AWS Console, AWS CLI, AWS SDK or CloudFormation.
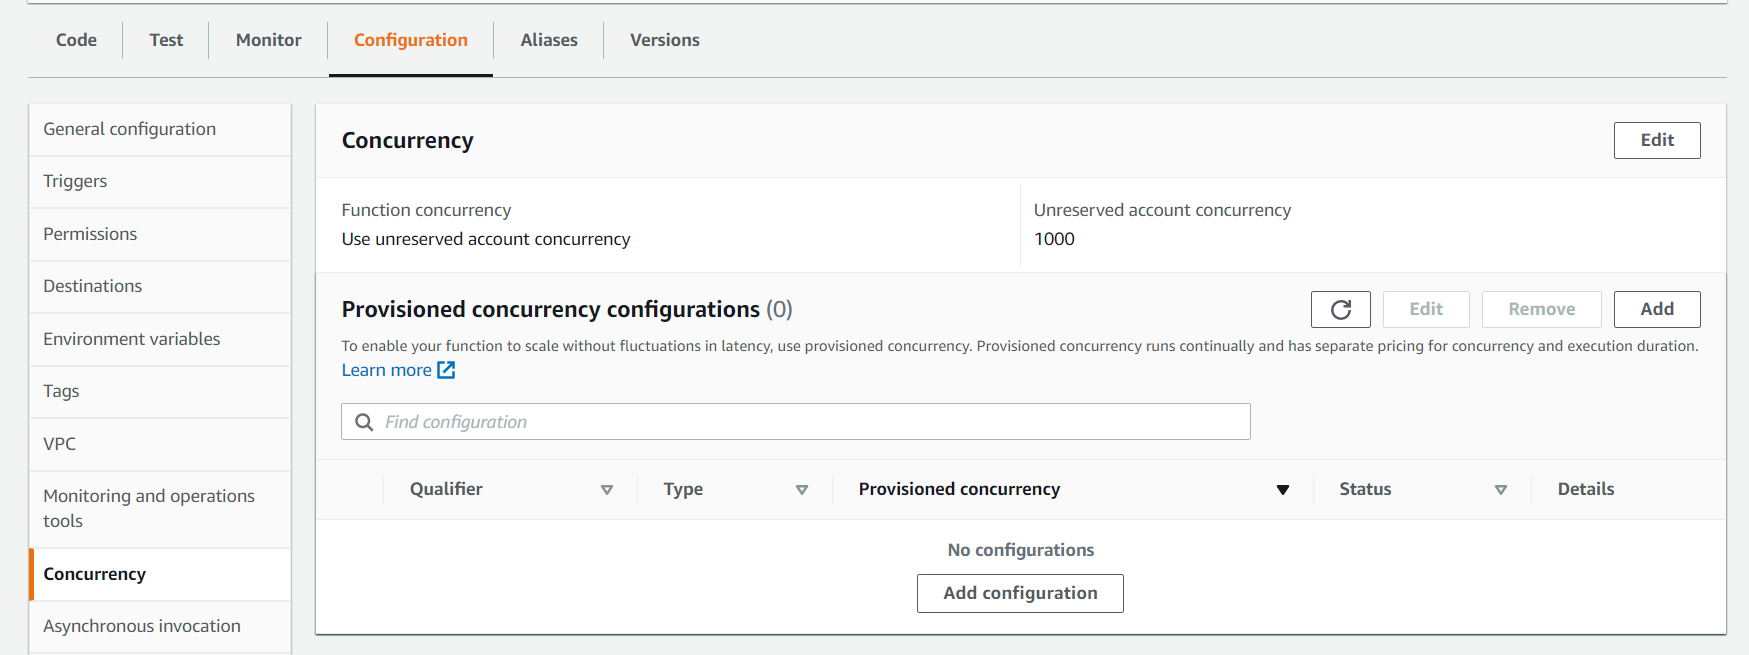
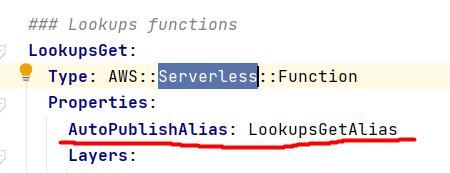
In our case, we selected the alias LookupsGetAlias that we keep updated to the latest version using the AWS SAM (Serverless Application Model) AutoPublishAlias function preference in our SAM template.
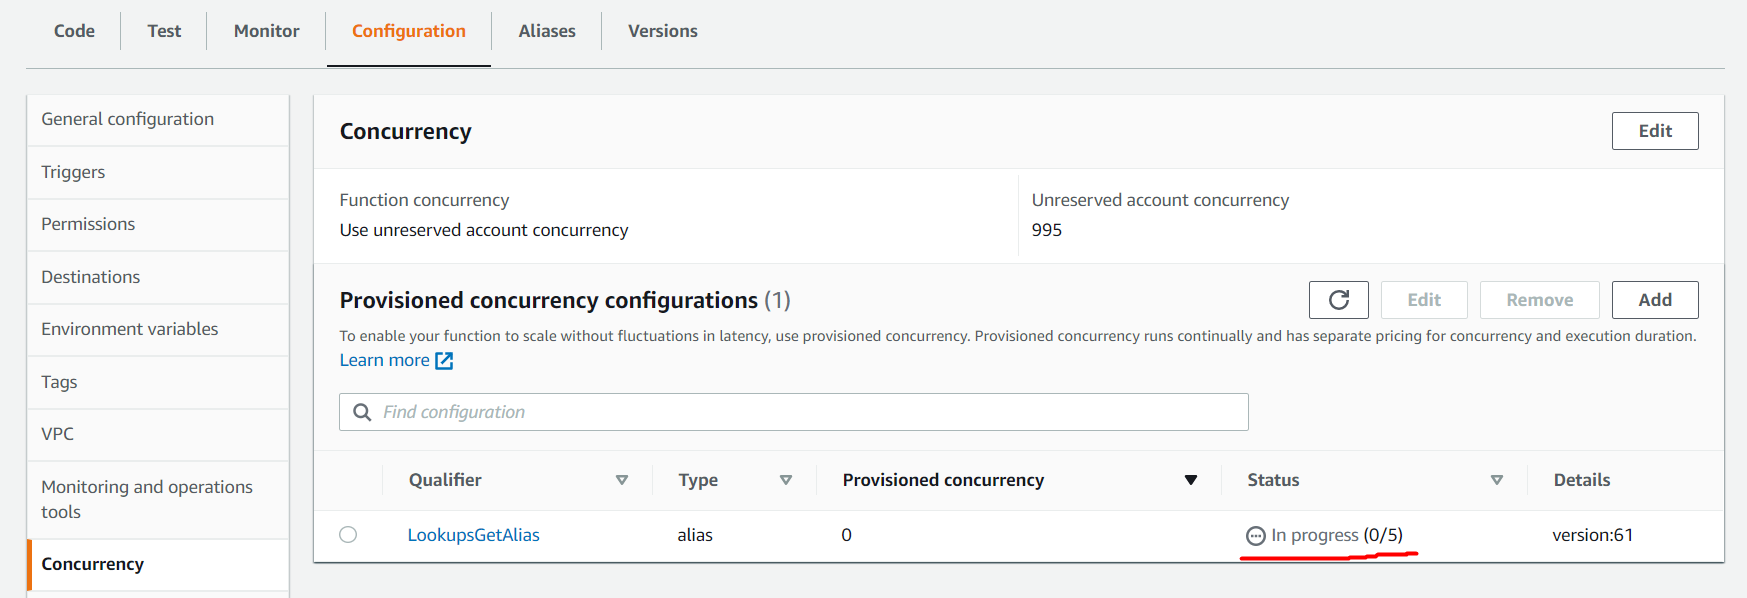
Provisioned concurrency enabling can take a few minutes (time needed to prepare and start the execution environments) and you can check its progress in the AWS Console. During this time, the function remains available and continues the work.
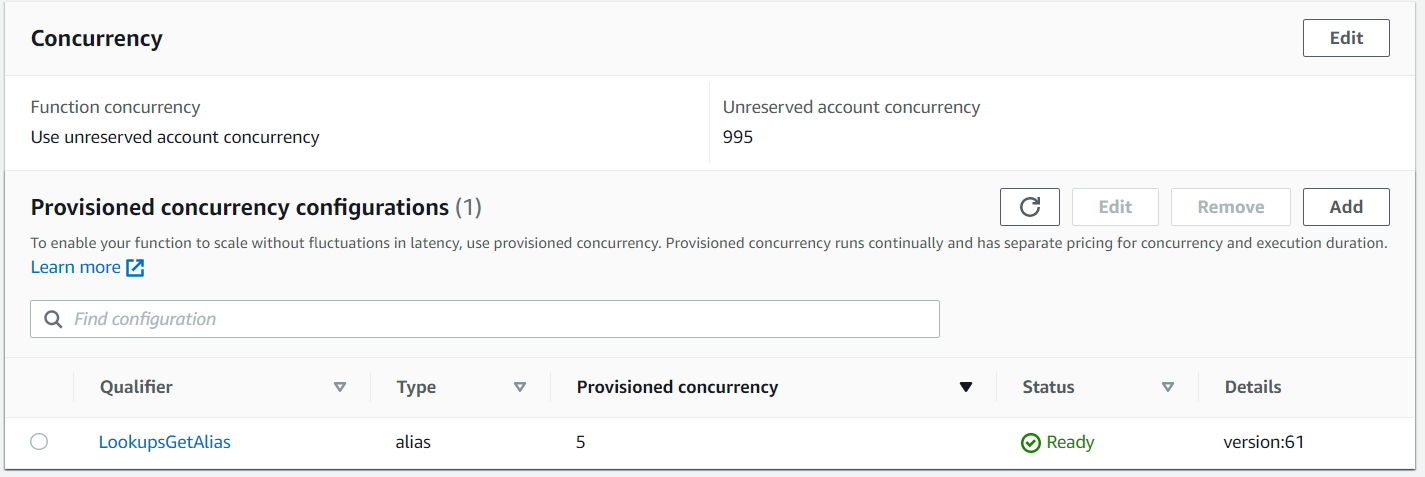
Once fully provisioned, the Status will change to Ready and invocations are no longer executed with regular on-demand worker nodes.
You can check that invocations are handled by Provisioned Concurrency by monitoring the Lambda function Alias metrics. You should execute the Lambda function and select the Lambda function Alias in the AWS console and go to monitor Metrics.


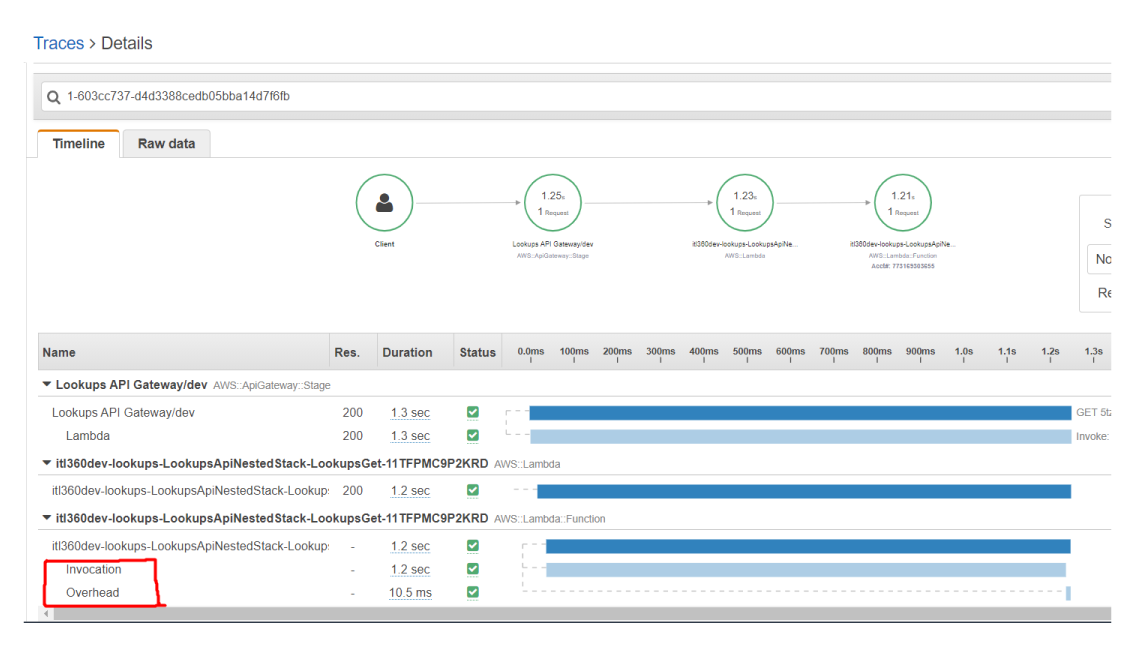
However, as before, the first invocation would still report as the Init Duration (the time it takes to initialize the function module) in the REPORT message in CloudWatch Logs. This init duration no longer happens as part of the first invocation. Instead, it happens when Lambda provisioned the Provisioned Concurrency. The duration is included in the REPORT message here purely for the sake of reporting it somewhere.

But, if you enable X-Ray tracing for Lambda function, you will find that no initialization time is registered, only execution time.
If you trigger Lambda function via Amazon API Gateway using the LAMBA_PROXY as Integration request, you will need to set Lambda function Alias in the Lambda function reference.
Another important thing to keep in mind when using Amazon API Gateway, Lambda functions and you want to prevent cold starts is to provide Provisioned Concurrency to all Lambda functions used in the API GW. For example, if you are using custom Authorizer in the API GW Authorizers, you should do the following:
- Configure Provisioned Concurrency on custom authorizer Lambda function Alias
- Use Lambda function Alias reference in the API GW Authorizers.
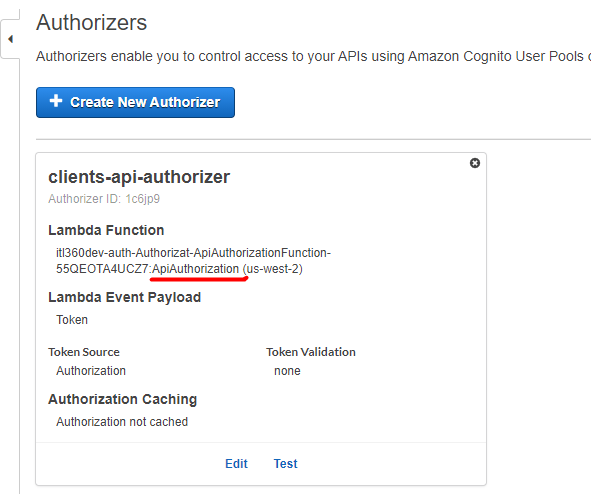
- Set Permissions with Resource-Based policy on custom authorizer Lambda function to be able to invoke with defined API GW.
You can track the performance of your underlying services by enabling AWS X-Ray tracing. Be aware of AWS X-Ray pricing.
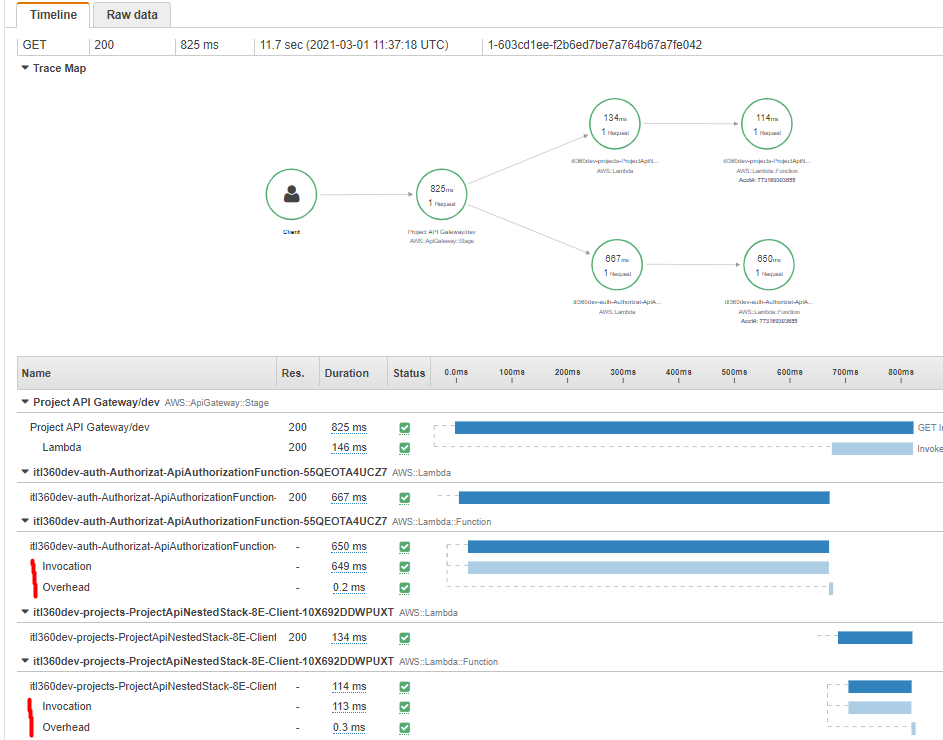
Otherwise, end user will experience longer load time, caused by custom authorizer lambda function initialization. We can see this in the AWS X-Ray traces by enabling X-Ray tracing on API GW Stage.
Scheduling AWS Lambda Provisioned Concurrency
For our project purposes, we found that spikes are usually during the day, from 10 am until 8 pm, and there is no need for provisioned worker nodes during the night. That’s why we decided to use Application Auto Scaling service to automate scaling for Provisioned Concurrency for Lambda. There is no extra cost for Application Auto Scaling, you only pay for the resources that you use.
We are using AWS SAM to schedule AWS Lambda Provisioned Concurrency and to deploy our application. The following code shows how to schedule Provisioned Concurrency for production environment in an AWS SAM template:
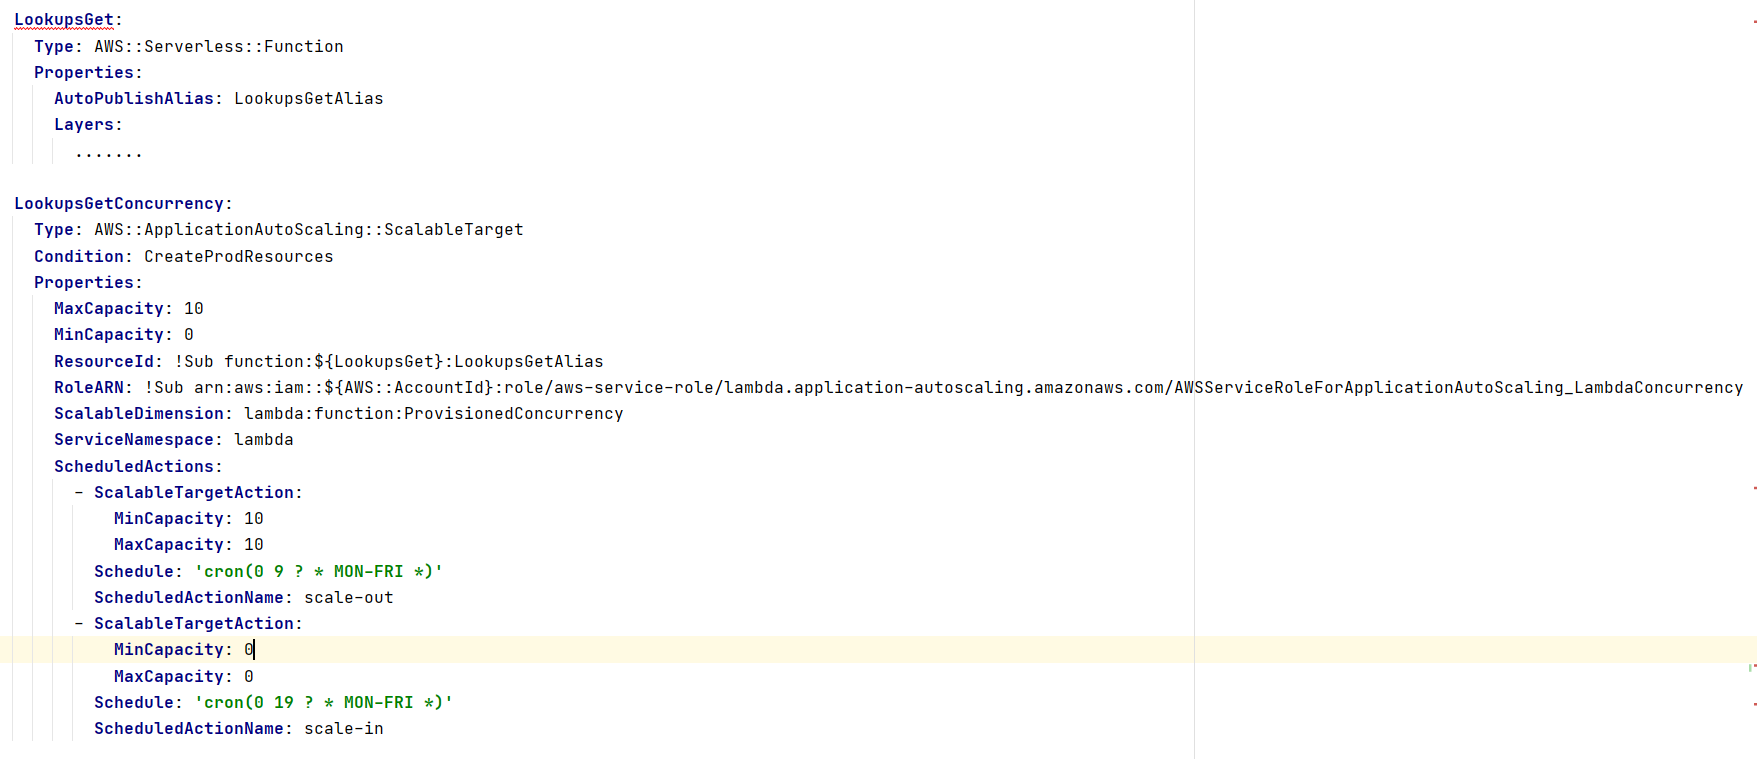
In this template:
- You need an alias for the Lambda function. This automatically creates the alias “LookupsGetAlias” and sets it to the latest version of the Lambda function.
- This creates an AWS::ApplicationAutoScaling::ScalableTarget resource to register the Lambda function as a scalable target.
- This references the correct version of the Lambda function by using the “LookupsGetAlias” alias.
- Defines different actions to schedule as a property of the scalable target.
- You cannot define the scalable target until the alias of the function is published. The syntax is <FunctionResource>Alias<AliasName>.
Conclusion
The use of serverless services, as AWS Lambda function, and their downsides, affects the end-user experience. Cold starts impact your serverless application performance.
Provisioned Concurrency for AWS Lambda function helps to take greater control over the performance and reduce latency in creation of execution environments. In combination with Application Auto Scaling, you can easily schedule your scaling during application usage peaks, and optimize cost.
Enjoy your day and keep safe!

IT Labs wins the Gold!

ISTQB – Gold Partner status means top-notch testing
Software bugs beware!
The software testing team at IT Labs has brought home the gold — as in, Gold Partner status awarded by the International Software Testing Qualifications Board, or ISTQB.
This ISTQB partnership is an indicator of the high-level skills and competencies of the 200-member team at IT Labs, which has a longstanding commitment to the continual growth and development of its team members.
“What this recognition means in real terms is a powerful combination of defect prevention, pre-test defect removal, and better testing that avoids costly and embarrassing bugs in software,” says Ilija Mishov, founding partner of IT Labs. “That saves time and improves quality.”
Testing certification brings software quality awareness, best practices, and context for developers, testers and business analysts as they work together in the Agile environment.
“It makes a huge difference to have objective metrics to guide and control a project and accurately report the status, as well as having defined entry and exit criteria,” Mishov adds. “Also, this level of certification means a testing team is able to meet and overcome some of the obstacles to high quality – incoming quality, time, manpower, and so on – because they’re now equipped with tools and techniques to address those issues. This arsenal of testing techniques has a direct and positive impact on the bottom line.”
The ISTQB Partner Program comprises four levels of partnerships (Silver, Gold, Platinum and Global), and the partnership level of an organization is determined through the number of certification points it has accumulated.
For more information, visit http://www.istqb.org/partner/.

The Secret to Improving ROI on Software Development Projects
For tech leaders having an agile software development plan for their enterprise — that is future proof to COVID-19, Brexit, and is available when called for — is probably needed now more than ever before for UK businesses.
Many businesses were able to carry on as normal through the disruption caused by last year’s two major antagonists. However, many businesses had to close or go into hibernation, furloughing employees and even parting ways with some.

John James Abadom
Business Partner at IT Labs
As businesses re-emerge from the cold thaw, a dynamic approach is needed for organizations to fare well in 2021, especially by upscaling and moving at speed.
However, in the UK we are facing a skills shortage, and IR35 is officially activated.
Hiring the right talent with the necessary skills, and that is flexible, is crucial for achieving and maintaining agile software development. This delivers high levels of performance within an organization, improving employee productivity and customer satisfaction by applications and systems being made highly available.
Businesses will have placed various programs and initiatives on hold that will now require additional resource planning and Human Capital Management (HCM) to deliver success.
It will be imperative for organisations to have processes such as ‘Software Delivery Life Cycle’ (SDLC) and strategies that embed the use of cross-functional teams, which can improve productivity for the betterment of your staff and customers and help your organizations flourish in 2021.
Brexit is here, and UK organizations that rely on EU IT talent might have to revise, or review, their strategy for sourcing software development teams at scale, and at speed, to deliver business outcomes.
Solutions today need to offer organizations the ability to be dynamic, creating super teams that are highly skilled at using innovation and technology to advance their organization, whether by adopting a Cloud-First approach, embedding ‘Next-Gen’ technology such as AI, RPA, ML, Cloud, etc… or by adopting agile frameworks and methodologies (Scrum, Lean, Kanban, XP, Crystal, DSDM and FDD).
The UK and USA signed a joint Customs Mutual Assistance Agreement (CMAA) late last year, which is aimed at enhancing bilateral approaches that secure and facilitate lawful trade between both countries. This declaration has opened opportunities for British businesses wanting to launch into new markets, or even consider global expansion as their next agenda on their five-year business/IT strategy plans.
Will businesses in the UK be agile enough to consider — and even take advantage of — this agreement and opportunity?
As we navigate 2021, there is a sense of required dynamism and the need to have access to high-performing, purpose-driven software development teams.
Developing relationships with experts like IT Labs might well make the difference for your organization in 2021.
Wouldn’t it be great to face this year with confidence in your company’s ability to further improve the ROI on software development projects?
Should you want to find out more about how IT Labs is working with FTSE 100 and mid-size companies, feel free to reach out to me at john.abadom@it-labs.com to schedule a short discovery call.
Should you be moving to Micro Frontends?

Kiril Zafirov
Front End Engineer at IT Labs
This article describes how to achieve frontend architectures using multiple frameworks and libraries with a particularly important goal in mind. i.e., combine into a single web application while displaying one result (as illustrated in Figure 1), and at the same time not affecting the user in terms of how he sees the page.
The technique of micro frontends is the process of decomposing a large frontend monolith application into smaller chunks that can be developed, tested, and deployed independently while still appearing to the user as a single product.
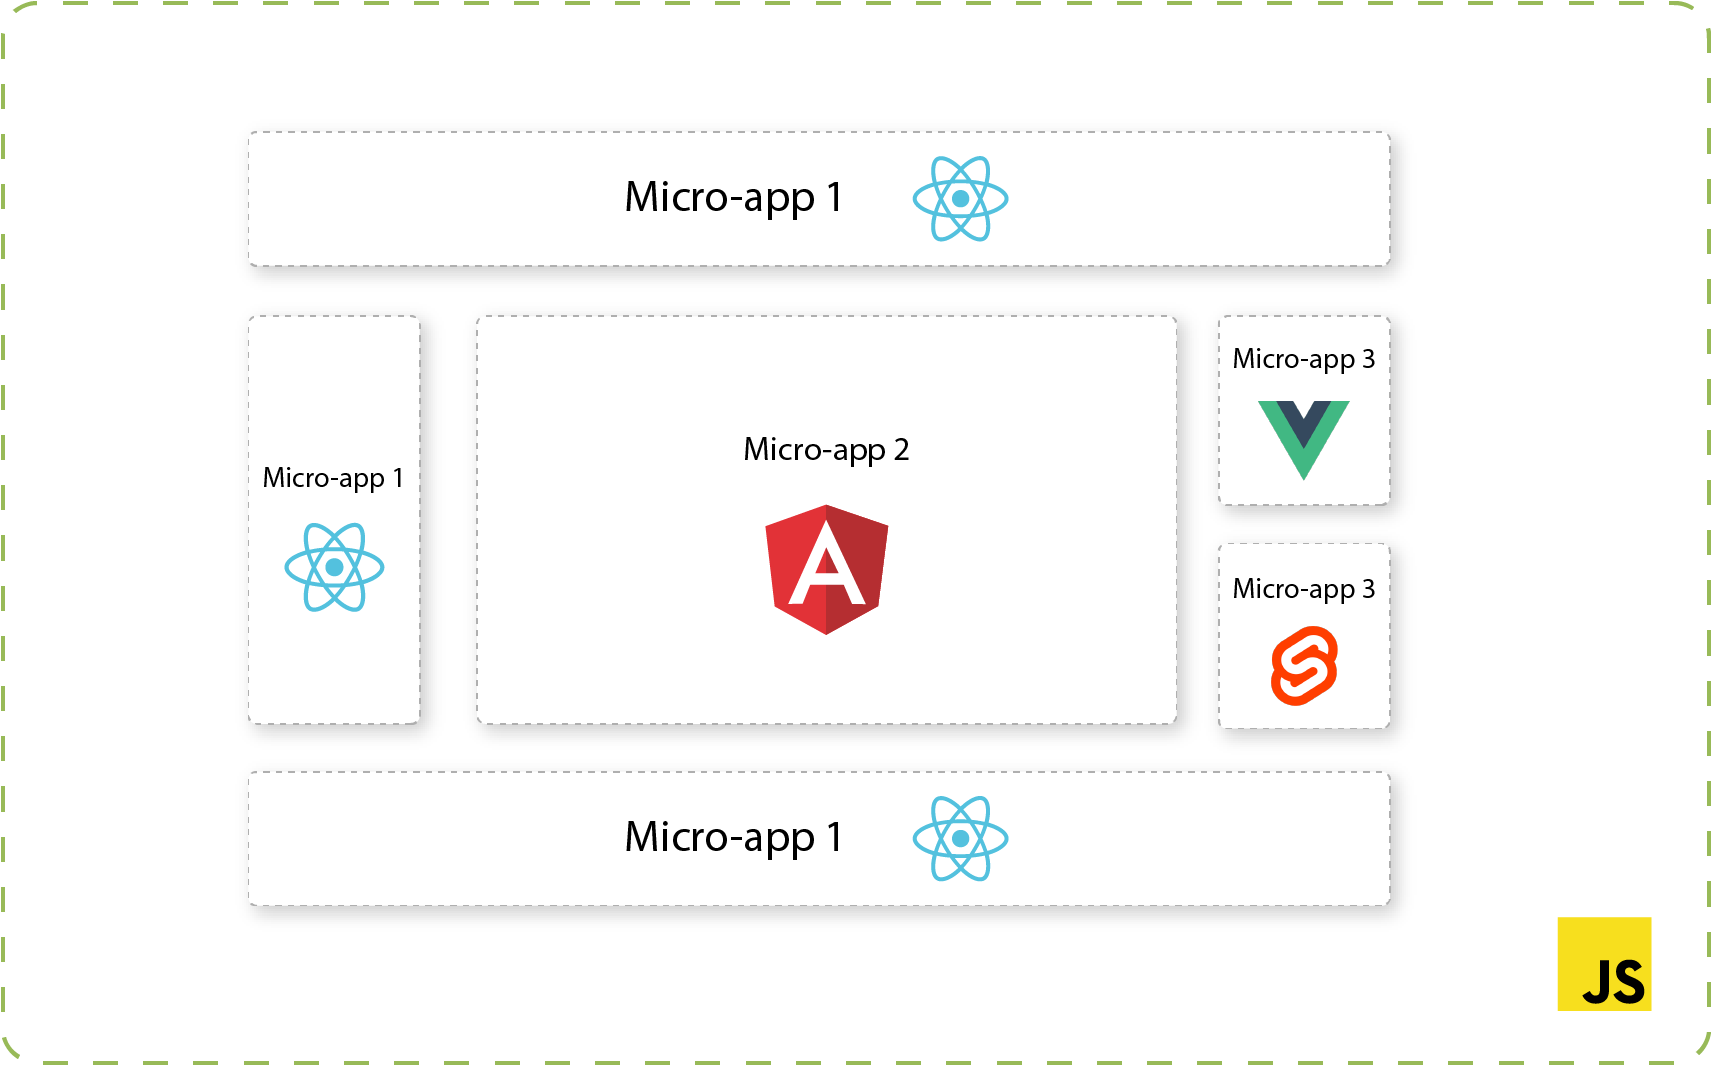
Figure 1: Multiple micro frontends combined into single page
What are micro frontends
"An architectural style where independently deliverable frontend applications are composed into a greater whole"
– Martin Fowler –
The idea behind micro-frontends is to present the business subdomain and allow the team-independent implementation with the same or different technology choices, as illustrated in Figure 1. The web application is a composition of features owned by different teams, each with different domain problems. The web development’s front end can (and should) follow the same structure. This is where the micro frontends come into play. Each of the micro frontends can be independently developed and tested in terms of features and responsibility.
Micro frontend architectures’ requirements are a shared codebase, preferably in JavaScript, managing routing and user-sessions. Additionally, maybe a thin collection of style sheets, a collection of separate modules “mini-apps,” various built-in frameworks and possibly stored in different repositories, and a deployment system that bundles all those modules together and deployed to a server.
We will touch on the following in this article:
- What are the pros and cons of this approach
- The different approaches/implementations that can be taken to build such architecture
- Cross-Application Communication
- Routing
Reasons why you should move to micro frontends
As software architecture evolves, the front end should follow that evolution as well, as shown in Figure 2. If we look back, the applications were built as large monoliths. This slowly progressed to microservices, but the UI got stuck as one large monolithic codebase, structured around the solution as a whole and not around a certain domain. This way, even the smallest of changes that needed to be deployed would’ve meant redeploying and running the pipelines for the whole front end again.
The proposed approach of micro-frontends came about naturally by following the microservices pattern,
Figure 2. Software Architecture from Monolith to Microservices
where it would be dividing the teams as independent owners of the whole feature end-to-end.
Each team would be responsible for the creation of the UI portion of the application, styling, code, layout, architecture, backend, devops, and connection to the database. It has its own build and test pipelines and CI/CD procedures. This enables the following:
- Better scaling capabilities of the frontend application
- Fewer communication issues between the multiple teams for one feature change
- Reduced code and testing complexity
- Aids with the application being more resilient to non-working or broken portions
- Helps to overcome the law of diminishing returns
Figure 3. End to end teams with micro frontends
Several companies and projects are running into the issue of having old, large codebases demanding full rewrites. These were probably the side effect of pressure to get faster to production and market, instead of evolving the product for maintainability. This is creating a situation that can be seen as a time-consuming rabbit hole where developers get weighed down by old tech stacks or the large monolith’s sheer complexity and subsequently unable to deliver new features to customers without being held back.
And usually this is where incremental updates start with having one team getting the first feature as a micro frontend delivered to production and the rest of teams will follow. The end-game is that we are free to make case-by-case decisions on individual parts of the product and be able to make the incremental upgrade to the existing architecture. Each micro frontend can be upgraded when needed or makes the most sense and be redeployed as a separate portion, rather than having to upgrade and migrate everything at once. If we want to experiment or do the new feature in the latest technology that is still in the experimental version, we can do that in a more isolated fashion than we could before.
The source code being delivered for each micro frontend is much smaller than the source code for the whole monolith which is also a plus because you can implement lazy loading and improve the performance of each service separately and thus on overall on the application and the user experience. The code is isolated and may be placed even in different repositories. There is a clear line around the bounded context and what should the application contain according to that context. Micro frontends architecture forces your decisions to be explicit and deliberate about data and events flow between portions of the application.
Independent deploy ability of micro frontends is key to success! This reduces the scope of any given deployment and all the risks that comes with it. Autonomous teams have full ownership of everything and they deliver the value to users which enables them to move quickly and effectively and as described in Figure 3. Teams need to be formed vertically for each functionality on the contrary to technical capabilities.
Monoliths are not bad but at times they are hard to manage. In a large monolith with pieces tightly coupled and interdependent, whatever change, upgrade, update, fix, no matter how small it is it demands the whole monolith to undertake the change and be released, and in cases if there is sub-dependents on the monolith they will also be affected.
Benefits
Some of the key benefits of micro frontends include:
- Small – Smaller, cohesive and better maintainable codebases
- Autonomy – Autonomous teams can develop, test and deploy independent features from start to end on themselves.
- Manageability -The ability to rewrite, update or upgrade parts of the frontend in a more incremental way than it was previously possible
- Ownership – ability for a single team to decide and take responsibility for a feature
How to micro frontends
In order to be successful with micro frontends there a number of cases that need to be discussed and decided. From an implementation point of view, there are certain principles that need to be followed
- Define – Each micro frontend needs to be defined around a business domain or a feature. Model around the business domain
- Compose – How each micro frontend is going to be composed
- Route – How is it going to be called or routed to
- Communicate – How is it going to communicate with the rest of the application
- Decentralization – Separate each micro frontend in its own repository , create independent pipeline as you are working in a single independent application
- Orchestration – bringing all the micro parts to work together
- Independent deployment – The team owning a micro frontend should be able to independently work, update, deploy, redeploy the application without touching on any of the other micro frontends.
- Isolation of failure – When one micro frontend is not working properly or down that should not affect the other existing applications.
Before starting developing and architecting a solution we should also have in mind that the solution that we are going to build should be technology agnostic.
- All of the code that is going to be written should be isolated and independent per micro frontend
- Each team should posses its own prefixes and they should not come into conflicts with other teams
- Stick to the native browser features and do not go and invent your own
- The application that is going to be built should be as resilient as possible (Universal Rendering and Progressive Enhancement to improve perceived performance).
There are implementations ways of achieving micro frontends and we will be discussing some of them next.
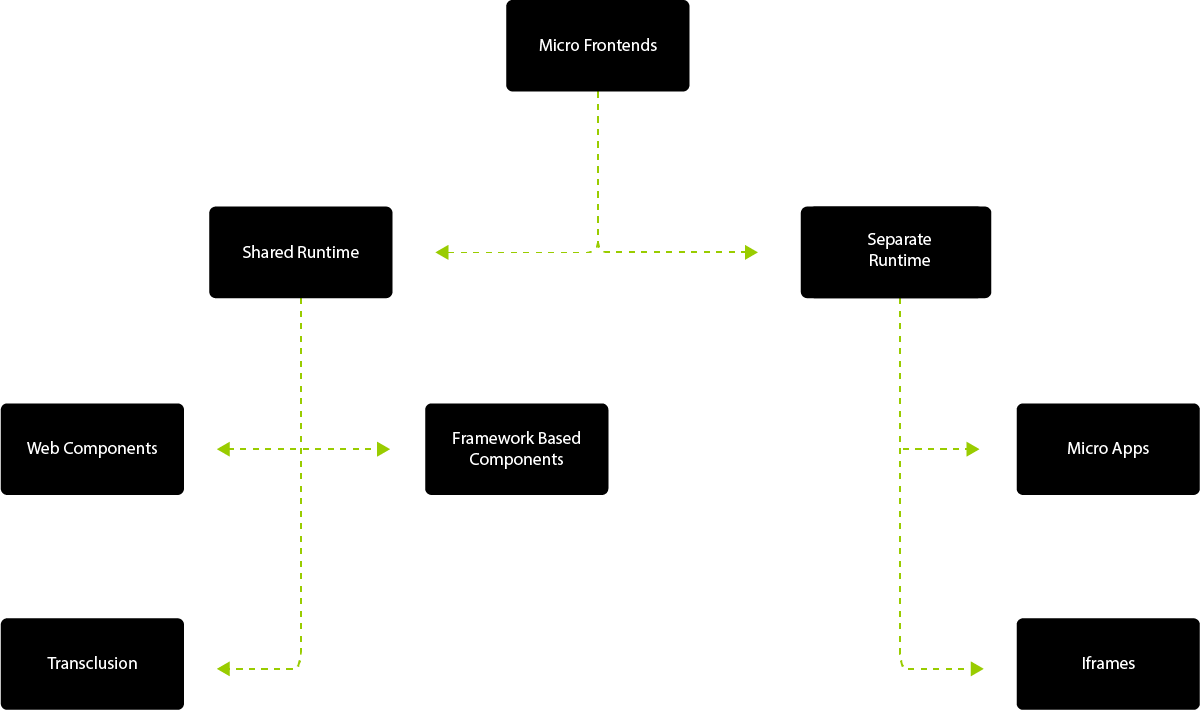
Figure 4 Micro Frontend Techniques
There are two approaches to micro frontends based on the type of runtime they have and both with its sub-approaches. As the name suggests, these are being divided based on the environment the micro frontend has and if its being shared between multiple micro frontends a.k.a shared runtime or does it has its own separate runtime. This two further branch out as it is being displayed in Figure 4.
Shared Runtime
In this approach the runtime of the application is being shared between the micro frontends. Thus we might conclude that if there are two or more micro frontends in the same page and one of them is doing some heavy computation or requires the main thread more, this might cause blockage for the other micro frontends that are on the same page.
Web Component
Pros of this approach are :
- Web components are more or less encapsulated depending on if Shadow DOM is used or not.
- Leverage common assets and consistent look and feel.
- Easy to consume shared code and reduced overall amount of code that needs to be shipped (also prevents code duplication).
- SEO and A11y are being treated as any other HTML code.
- Fully framework agnostic and can be used as both web app or mobile hybrid application.
Cons to this approach are:
- Bad support of older browsers (using pollyfills).
- Initializing and bootstrapping multiple components in a page can cause performance impact.
- If the application is bundle as a whole, any small change can trigger the whole build/deploy cycle for the whole application.
Framework Based Components
These are usual framework build controls and can be built with any of the existing or the framework to come. The challenges that need to be overcome in order for this approach to work are the vendor lock-in, they are difficult to migrate and it is extremely difficult to combine with multiple frameworks. They are not tech agnostic and they are hard to be build as autonomous features.
Transclusion
This includes applications that are being rendered at the server side using various techniques to do server side rendering and the combination of various applications in order to be delivered as a single page. The benefits of this approach are simplified client side processing and user experience, but the cons to this approach is that there is no native way of doing it and that it slows the overall page.
Separate Runtime
In this approach each micro frontend has its own runtime and it is fully independent of the other micro frontends. All of the micro frontends should be able to run in parallel without any taking the main thread and blocking the others.
MicroApps
When using the microapps approach tend to build features horizontally by vertically dividing teams, so in terms of meaning when you start developing the micro frontend respect the tradional development with embracing the javascript ecosystem and dynamic rendering, whilst investing up front in setting up teams structure and overcoming testing and scalability challenges and also dependency management.
With micro apps the user experience is slightly off because each application is isolated and has its own styles, framework, team and code logic, so there might be places where UX might be off. Other then that micro apps reap all the benefits from this approach meaning they are autonomous, tech agnostic, value and microservice driven, and they are being owned by a team. The combination of the application can be done on both the frontend side and on the server side and this will change complexity of the application transfering the complexity to the side that is going to be doing the combination. If done on the client side browser would include the content using AJAX and this reduces the backend complexity but it will introduce huge front end complexity and performance problems.
This approach is also not tech agnostic and tends to deliver bad user experience:
IFrames
- Pros of this approach are:
- That the team developing the application can be fully independent also in terms of choosing their own technologies and cycles
The application is fully encapsulated in the iframe, so it does not affect The Host javascript or css.
Cons to this approach are:
- A lot of duplicated code if more then one micro app is initialized in a single page and this is mostly because assets, fonts, styles cannot be shared between host and app
- Routing can become very complex
- Difficult internationalization, preservation of unified styles
- Additional code to handle iframe resize and problems that come with iframes
- Not so much SEO and A11y friendly
No matter what of the upper approach you would be taking, Orchestration for bringing everything together is needed in order to combine all the micro-parts to be functioning and working together. This can be assured with having a dedicated team to do just that and that team is called ‘The Host’. This team is in charge and responsible for orchestration and composition and is responsible for
- Configuration for initialization
- Routing
- Communication between components
- State Management
- Providing commons/shared code
- User triggered event-based API’s
In order to dive deeper into micro frontends there are a number of useful API’s that can excel the composition of micro frontends.
Common considerations and downsides for all micro frontend implementations
Some micro frontend implementations can lead to duplication of dependencies, increasing the overall size bundle of the application and the bytes the user must download. As a caution that you should be also aware is because of the team autonomy each team can work in a separate fashion and that can cause team fragmentation.
Operational and governance complexity
As number of micro frontends grows so does proportionally the number of repositories, tools, build/deploy pipelines, servers , domains etc. So, before continuing further, code quality and consistency should be agreed upon, the governance of the teams should be assigned, automation for all the processes should be provisioned, and the processes set should be able to scale.
When you choose micro frontends, by definition you are opting to create many small things rather than one large thing. You should consider whether you have the technical and organizational maturity required to adopt such an approach without creating chaos.
Cross-Application communication
One of the most common questions regarding micro frontends is how do we make it available for them to communicate with each other. And the saying goes that we should keep it to a minimum and if they still need to communicate, group them and bundle them together because with high communication frequency they should be part of a single piece. With each communication connection we add between them we introduce a dependency between them which we initially were seeking to avoid. Anyway this wouldn’t be a valid communication section if we didn’t mention a number of communication ways so:
- Custom Events – They allow micro frontends to communicate indirectly which has a good side that minimizes direct contact and coupling, but also on the bad side it is harder to determine where the event originated from and enforce a contact that now exists between the micro frontends
- Event Bus – There is a custom event bus strategy that allows for the creation of the event bus on “The Host” micro frontend and importing it the micro frontends that need to communicate with each other
- Backend – Communicate through push and pull based communication via an API connection through the backend
- Routing – Address bar as a communication Mechanism
No matter the approach that we choose we should strive to have our micro frontends communicate by sending messages or events to each other, and avoid having any shared state.
Routing
It is best to have a separate page for each micro frontend and not to mix them too much on a single page. So the recommended way of handling the routing is to give the control to “The Host” micro front end and he is responsible for doing the navigation and loading of the bundles.
https://host.com/Team-A
https://host.com/Team-B
https://host.com/Team-C
Testing
Testing each micro frontend should be easy and simple as testing a monolith with the exception that not a lot of external dependencies and connections are required.
Existing Framework supporting micro frontends
The framework that we used in our example — as of this writing, one of the best out there — was Single Spa (Micro frontends approach that is composing multiple SPA’s together built by Canopy) with the support of System.js where you can define a single root micro frontend that is going to provide the previously talked “The Host” capabilities to all the rest of the applications. Some of the rest are :
- Bit – which is component-based approach. Different teams can build, publish and expose their components independently, while you can also integrate and compose independent components together.
- FrintJs – It lets you load apps coming in from separate bundlers, gives your applications a structure, and handles routing, dependencies and more. (mostly for react)
- Mosaic – Mosaic is a set of services, libraries together with a specification that defines how its components interact with each other, to support a micro-service style architecture for large scale websites.
- Podium – server side composition of micro frontends
- Polymer – Web components approach. This is a Google-owned project.
- OpenComponents – is an open-source, “batteries included” micro frontends framework.
Micro frontends – Demo project sample
We will be using the Single Spa approach to building a demo micro frontends application.
The application that we are going to build is displayed on the following image:
Figure 5: Micro frontend demo application
There are two types of highlights in the figure above and the red highlight is for the Navigation bar application which will be active all the time together with the root application – “The Host” and the rest of the applications are highlighted in green and they are as the name suggests Account Settings micro application built with Angular v10, Admin micro application also built with Angular v10 and Users micro application build with React v16.
Here you can have at least two more micro applications based on the architectural decisions that you need to make and which approach should you choose. You can have application with shared libraries and resources and also a micro app that will import the general styles for all the micro frontends. In our approach we choose not to use any shared styles, libraries or modules in order to not have any coupling between the micro applications.
Create and configure single-spa app
In order to start with developing the micro frontends applications you need to have single spa installed globally (or locally on your machine). In order to install it, type the following command in your command prompt:
npm install —global create-single-spa
Assuming that you are already in the folder that you want to start working with micro frontends you can go ahead and type in:
// Creating the single-spa app
npx create-single-spa
if not, you can use the following commands to create a directory and navigate to it from the command prompt:
// Creating the folder for all projects
mkdir microfrontends
cd microfrontends
// Creating the root app folder
mkdir root-config
cd root-config
and then type the command for creating the single spa root application:
// Creating the single-spa app
npx create-single-spa
So, after running this command you will be prompted to fill out a number of additional inputs via the command line and you should select this according to your need (you can see on the Figure 6 bellow for information on how the prompt looks like).
For Directory you can type free text to create a directory for where you want the cli to generate the new application, for new project you can select one out of three options that are there
- single-spa root-config (you can have only one of this kind)
- single-spa application / parcel
- in – browser utility module( styleguide , api ,cache , etc) as shown in the figure below:
Figure 6: single-spa app configuration
Some of the other questions that you are asked are which package manager you would like to use and you can choose npm or yarn, will this project use typescript and you can choose Y/N, if you would maybe like to use the Single-spa layout engine which is very useful it asks for an organization name and a project name and you are done.
Figure 7: single-spa app additional configuration
The important one is the second one which asks you to Select type to generate? and for that you should enter single-spa root config in order to generate the root micro application.
After generation of the root config, go ahead and for each application create a new folder to put the micro application in and repeat the step of:
npx create-single-spa
you should now select:
single-spa application/parcel
and for framework you can choose which one you wish to use.
Repeat this step for all the applications that you need (Account Settings, Admin, users)
When you finish with the installation of each application in the console logs you see the following output:

Figure 8: single-spa creation output
You can choose to start it locally or follow the steps 2, 3 and 4 in order to test it in the browser in the single spa playground.
We used System.js to create import maps for all the micro frontend applications that we needed and imported them into the root config. For production and for development use these can be set to be loaded dynamically.
System.js allows us to import a module over the network and map it to a variable name.
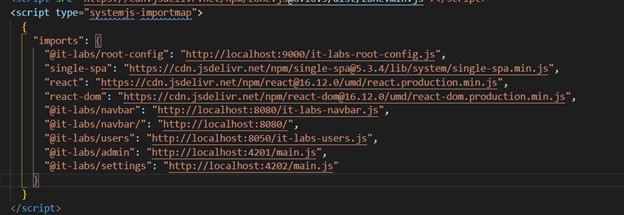
Figure 9: System.js configuration
Each micro frontend application should have different ports.
App configuration
In order to register the application you need to define it in the root-config.js .
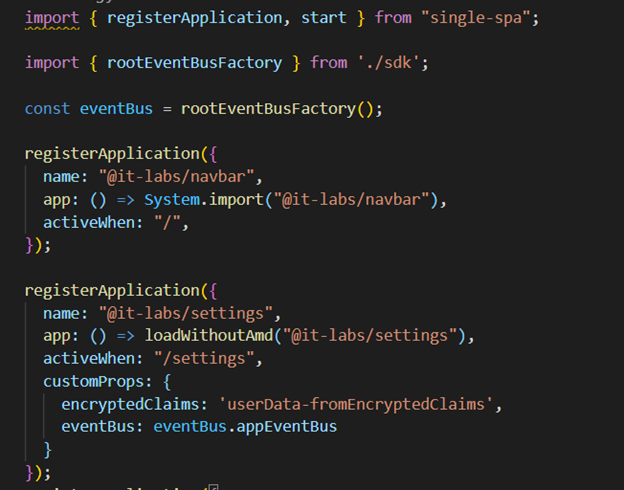
Figure 10: App configuration – root-config.js
All of your micro frontend’s applications must be registered in this file so for each application we would have a similar registerApplication function call like the one shown below. The name usually follows the pattern of “@organization/appName”.
We used eev for communication between the micro frontend applications and you can add a number of custom properties based on the needs of the organization.
To define cases where you want them to be valid only for certain environment you can wrap them in an “if” statement following the pattern shown in the figure below (This is in the index.ejs file in the root-config application).
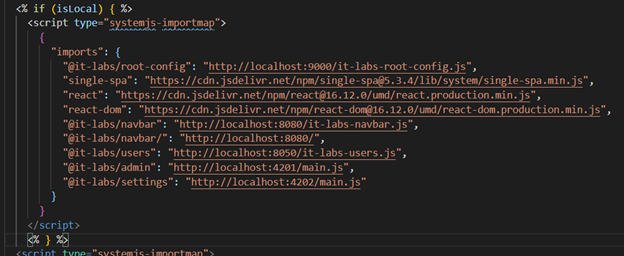
Figure 11: Environment configuration
For the layout of the application, we used single spa layout which is a helper library from single spa that allows us to write template in the head of the html document in order to specify the layout of the application:
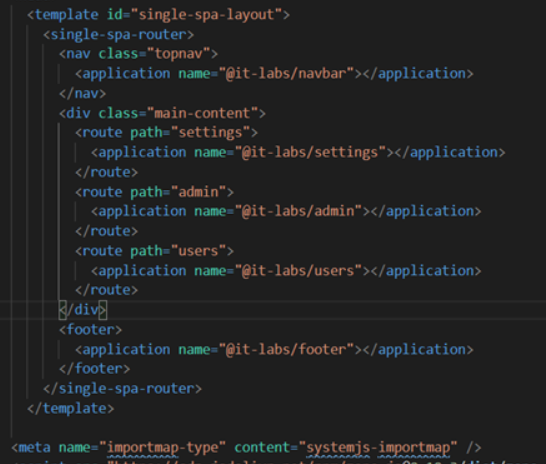
Figure 12: single-spa layout
If you want to checkout the full source code of this example you can do that here.
Single-Spa wrap-up
Single-Spa supported with the optional helper package single-spa-layout is a great framework and you can do a lot with it. It provides micro apps layout, routing, lazy loading, top level routing API controls, apps out of the box.
It supports most of the existing popular frameworks and libraries out there (at the time of writing this article) so that you can go ahead and create a new application add single spa to it and transform your application in a micro application. Because it has a lot of features, the best way to learn more about the framework is to go through the official documentation.
You can access the full source code of this example here. Have a great micro-frontend-programming!
For more information on how to proceed, go here.
Conclusion
Be mindful and use architecture patterns when needed. There are valid use cases for micro frontends, where they are probably the best solution, but also there are use cases where micro frontends are just a burden and too much of a complexity without any real benefit.
“Architecture is aways a trade-off – just find the right approach based on your context”
– Luca Mezzalira –
To make micro frontends possible you need at a bare minimum:
- Solid event driven strategy
- A team in charge of orchestration, routing and commons
- Well documented and defined style-guide
- Performance budget and mechanism in place to accelerate load
CONTACT US

Deep dive into IT Labs' recruitment process with Ana and Biljana
They are the first faces you will probably meet in IT Labs, and there is a reason for it. Biljana Stefkov and Ana Georgieva have a major role in the company’s growth by recognizing the talent that’s a good fit for our high-performing teams. You will immediately feel comfortable in their presence because they are a real embodiment of the company culture – professionals that are also kind-hearted people.
And they are the right people that can explain and clear the air on much confusion around the recruitment process. We had a wonderful conversation on different important topics related to recruitment in general, and how the process of recruitment looks like in IT Labs. It has meaningful insights that can help you prepare and make the right impression, so take a deep dive and read it.

Biljana Stefkov
Senior Recruiter

Ana Georgieva
Recruitment and Employee Engagement Specialist
Why did you choose this profession? Was it a life calling?
Ana: I think that I defined my career path early in my high school days, but I wasn’t sure what it meant back then. I started volunteering in the local NGOs led by the desire to be the voice of the voiceless, a friend of the lonely, and shelter for the unprotected. And as the saying goes, one thing leads to another, I started working as a social worker, but then I realized that I love business as well. Long story short, this is how I became part of the IT Labs HR team.
Biljana: I’ve always wanted to help people. By being a recruiter, that’s what you do. On the one hand, you help people find great jobs, and on the other, you help the company or client find great people. Seeing the creation of a long-lasting successful relationship is something that fulfills me. Years ago, I became interested in HR in general, and during my career, I was involved in a few of the streams covered by HR, but recruitment stuck close to my heart. The connections you create, the people you meet, the relations you see. Everything plays its part in deciding why I choose to work as a recruiter. I also see my personality as a mix of equal parts of creativity and drive for analytics. And found recruitment as THE profession that combines those two daily.
How do you break the ice with a candidate? Do you have a trick in your sleeve?
Biljana: I see the interview as a conversation with a smart, mature person who is great at what they do and is also aware of why we are having the conversation. So, in this case, I don’t necessarily see the need for having an ice breaker. When you know why you are there and know the discussion subject, it comes quite naturally to have the conversation. The main idea of having a quality talk is to listen to the candidate carefully and skillfully direct the conversation.
Ana: When I was a beginner, I was trying to introduce myself more formally and professionally. But, as time went on, I realized that the perfect mix between being professional and friendly to the candidate is the key to leading the candidate towards a fruitful and successful recruitment process. The candidates should be aware that the recruiters are their friends and the bridge between them and the hiring managers. After all, we have the same goal – to hire them.
What is your general impression – are people afraid of interviews? Can you suggest something that can help them shake off the anxiety?
Ana: Work on your attitude. I am not saying that you should be overconfident, but everyone enjoys having a conversation with people who have a winning attitude. Don’t overthink possible interview scenarios, prepare yourself (learn more about the position and the company), and go with the flow.
Biljana: I think people generally are not afraid of interviews. At the beginning of the conversation, it might come a bit odd to start sharing professional and personal aspects of one’s life with someone you’ve just met. Still, it’s the recruiter’s role to create an environment that will make the candidate feel comfortable and safe.
What‘s your favorite question to ask?
Ana: I don’t have favorite questions, although I always want to learn more about candidates’ favorite projects. In my opinion, it’s vital to learn about their points of interest, such as technologies, challenges, or what kind of teams they want to work in. Having this conversation can lead you to the conclusion if your company culture matches the candidates’ expectations.
Biljana: Each person is unique, and so is the conversation (interview) you have with them. I don’t have any favorite questions that I ask. The questions depend on the candidate’s story and the type of connection you create during the interview.
How would you describe the recruiting process of IT Labs?
Biljana: Process-driven and flexible 😊. That’s what I love about IT Labs. It has its defined ways of how a quality recruitment process should look like. Even though we follow it in most cases, it is flexible and able to be modified to achieve the best results for all parties involved (company and candidate).
Ana: I would agree on this one with Biljana. The perfect definition is indeed process-driven but flexible.
Why should a candidate become part of IT Labs?
Ana: If you want to work in a process-oriented, structured, but friendly environment, you should seriously consider joining our company. As part of the IT Labs team, I would like to emphasize that working in an organization focused on people’s growth makes me feel comfortable about my future.
Biljana: The decision of someone to change a job is quite personal, and I do think it needs to be based initially on personal needs, combined with what the other company and position have to offer. Once the personal aspect is set, IT Labs has a variety of advantages it can offer: multiple projects and clients, modern technologies used, interesting set of requirements in job positions, a culture of appreciation, balanced approach towards support and challenge of its employees… and much more 🙂
How do you sustain a professional manner while also being friendly to the candidates?
Biljana: I think that in business people create special bonds (especially during a recruitment process), but I see it as different rather than regular. A specific type of connection that is leaning more towards a professional behavior combined with politeness rather than friendliness.
Ana: Professionalism, among other things, means knowing the boundaries between work and personal life. There is no need for extra effort if you follow this simple rule. However, we have to show empathy and validate people’s feelings during the recruitment process.
What is the biggest challenge of being a recruiter?
Biljana: As in any profession, there are good days and bad days. What is important is to love what you do, and that’s how you’ll find joy in most of the days spent doing that. Personally, I don’t see a specific challenge of being a recruiter.
Ana: To understand your potential candidates’ needs, their interests, and to get their attention. I am not sure if this is the biggest challenge or the shortest job description ever (just kidding). 🙂
There is a negative trend of ghosting in the recruitment process. What is your take on this?
Biljana: To be honest, this trend is a worldwide issue from both sides – candidates and recruiters. As bad it is to be ghosted by the candidate, it’s good to take that as a lesson from a recruiter’s point of view and just imagine how a candidate would feel if you don’t come back with feedback after an interview. But I see this as a resolving issue in the future, since it’s quite connected with the increased usage of social media, and I believe that polite behavior principles will apply in this type of communication with time.
Ana: Being ghosted, either you are a candidate or recruiter, can make you feel uncomfortable. If the recruitment process was software, ghosting is the perfect example of having a bug in the software. It is essential to understand that the bug is not intentional neither nor personal.
I believe that both candidates and recruiters are aware of ghosting’s negative effect, but sometimes it happens.
It’s up to us to work on the continuous improvement of our responsiveness.
What is the biggest misconception that you have noticed regarding the recruitment process in general?
Ana: The biggest misconception that people have regarding the interview process and recruiter, in general, is that recruiters are just people who are collecting resumes and only care to fill the position no matter what. As a recruiter, I would say that this belief is incorrect. Our recruitment team is striving to build strong and long-term relationships with the candidates, understand the requirements in detail, find and hire the best-in-class engineers, and deliver high-quality results.
Biljana: Oh, there are quite a few… 😊. But something that I’ve noticed through the years is the misconception that the initial interview with the recruiter is unnecessary, meaningless, or just a procedural meeting, without the opportunity to benefit from it. I think the truer side of the story is quite the opposite.
The initial interview is a crucial part of the recruitment process. The discussion where both sides – the company (through the recruiter) and the candidate – can find out every important detail that helps them clarify whether they are a good potential match. The initial conversation with the recruiter is where you can ask and share literary anything you consider important for your career. It is a conversation that can lead to a life-changing decision. It has weight; it is a constructive and directed conversation towards a specific goal. At the same time, it is flexible enough to provide a safe environment for sharing and asking the tough question you naturally wouldn’t ask during the rest of the recruitment process. It provides the candidate with a key to all the company inside info you cannot find easily on the web. On the other hand, it allows you to meet your “go-to” person – the person you can lean on through the whole recruitment process (the recruiter).
On the positive side, I think this misconception of undervaluing the initial interview is slowly changing, as people feel freer to explore the labor market and go to interviews more often than they did previously.
How can a candidate WOW you?
Ana: People speaking with integrity can always WOW me. I am always amazed by candidates who have a high level of self-awareness, not only for their strengths but also their weaknesses. And the third thing that is crucial for me is the candidate’s eagerness to learn.
Biljana: True, honest people, with an awareness of personal strengths and flaws, amaze me in any setting, not only during the interviews. Having a conversation with this type of person is truly remarkable. And I consider myself lucky since this profession allowed me to meet many great people who nurture those values in themselves.
What‘s the best interview advice you can give to candidates or people looking for job opportunities?
Biljana: Just be yourself. Take ownership of what you know and what you do and bring that to the recruitment process.
Ana: Try to listen carefully and take your time to answer the questions. Interviewers are just people who passed the same process as you to get their jobs. We are aware that, sometimes, the interviews might be stressful for the candidates. Don’t fake it till you make it. Be yourself.
Maja Tanushoska
Digital Marketing Specialist
“Circle of responsibility "– a project that changes our society through activity and learning
As a socially responsible company, IT Labs is always more than happy to have an active role in helping change things for the better. That is why we are very proud that we created the project “Circle of responsibility” in collaboration with the “Faculty of Philosophy – Skopje,” an initiative that originated from the idea to combine acts of kindness and knowledge with young minds. After finishing the first series of online lectures, we can say that together we made a difference.


This summer, IT Labs and the Faculty of Philosophy started the project “Circle of responsibility,” promoting the idea of action and learning. 2020 has been a challenging year, but we were determined to create something positive and shine a light on a year that hasn‘t been so kind to the world. Through the project, we have engaged the students from the “Faculty of Philosophy – Skopje” to contribute to socially responsible activities of their choosing. As a reward, they got themselves a ticket to free online lectures provided by IT Labs.

“At our great pleasure, IT Labs showed care and interest to include the students from the “Faculty of Philosophy” in the project “Circle of responsibility” through four key lectures that will help them to become more competitive in their working field. At the same time, the project motivated them to get include in around a hundred social responsibility activities to get a ticket for the training.“
Ratko Duev
dean at the Faculty of Philosophy, Skopje.
With over 100 students as participants in 4 online lectures on different subjects such as digital marketing, how to crack the first job interview, business communication, and upgrading the knowledge in Excel, we are more than satisfied with the impact this project had on Macedonian society.

“As a socially responsible company, we are continuously dedicated to making changes for the better. It was an honor to share our knowledge with the young minds from the Faculty of Philosophy – Skopje, and I can honestly say that “Circle of responsibility” has made a significant change and made a full circle where acting and learning had achieved perfect symbiosis. “
Frosina Zafirovska
CHRO at IT Labs.
The students impressed us with their efforts by getting involved in so many different activities such as helping the elderly, donating food, creating and donating masks for Covid prevention, cleaning public spaces, and so much more.

“The students are an important group that can be a key catalyst of the social changes if they have the right support from the surroundings. In collaboration with IT Labs, a company that recognized the need to motivate and reward them, the students showed collective awareness and shared vision to get organized into making small and big changes in our society. “
Sofija Arnaudova
a professor at the Faculty of philosophy and coordinator of the project.
But our initiatives won‘t stop here. We are determined to broaden this story and have an even greater impact on our society. To motivate young minds to act and learn because it matters.
Maja Tanushoska
Digital Marketing Specialist