
Jovica Krstevski
Technical Lead

Aleksandra Angelovska
Quality Assurance Lead
In previous articles, we discussed “E2E development challenges and overview of the E2E testing frameworks” and “E2E Test Components”. The goal of this article is to simulate what a real user scenario looks like from start to finish and to provide E2E test examples with Cucumber and Nightwatch.
We will show real examples of our backyard project, how to set up the environment, and how to automate some of your tests.
The test includes three parts:
- Feature file, which is a clear description for each step of your test using Gherkin syntax.
- Step file, which is the script for matching the features and the Java code.
- TestRun, which is the configuration setup for running your test.
Some important things need to be taken into consideration when you configure your test-runner.ts. You need to configure it for your needs:
- Add environment option. Tests should be able to be easily rerun in any environment.
- Plan which tests to be run
- Smoke tests only?
- Specified tagged test(s)?
- Specified feature file(s)?
- Plan where tests are to be run
- Chrome in headless mode
- Browserstag
- Saucelabs
- Plan to run tests in parallel (if this is what you need)
- Set seleniumHost and seleniumPort
Writing nightwatch.conf.ts file
Take screenshots for the failed tests. This will help in debugging the failed tests.
Add option for your tests to be run on Saucelabs and Browserstack. This will help in browser compatibility testing.
Package.json
{
“name”: “api-e2e”,
“version”: “1.0.0”,
“scripts”: {
“report”: “node build/create-html-report.js”,
“prebuild”: “npm run clean”,
“build”: “tsc”,
“build:watch”: “npm run build — -w”,
“clean”: “node ./clean-up.js”,
“lint”: “tslint -c tslint.json ./src/*ts ./src/**/*ts”,
“debug”: “node –inspect-brk run-tests.js”,
“test:run”: “cucumber-js –require ./src/features/\\*\\*/*ts –require-module ts-node/register –require ./src/hooks/*.ts –format ./node_modules/cucumber-pretty ./src/features/”,
“test”: “./node_modules/.bin/ts-node src/test-runner.ts”,
“selenium:local-standalone”: “ts-node server.ts”,
“selenium:local-docker-hub”: “docker-compose up”,
“generate-report”: “ts-node ./src/create-report.ts”,
“e2e-test”: “npm test”
},
“keywords”: [ ],
“author”: “”,
“license”: “ISC”,
“devDependencies”: {
“@types/cheerio”: “^0.22.7”,
“@types/cucumber”: “^4.0.4”,
“@types/debug”: “^0.0.30″,
“@types/faker”: “^4.1.2″,
“@types/lodash”: “^4.14.115”,
“@types/node”: “^10.3.2”,
“fs-extra”: “^6.0.1”
},
“dependencies”: {
“bluebird”: “^3.5.2”,
“cheerio”: “^1.0.0-rc.2”,
“chromedriver”: “^2.40.0”,
“config”: “^1.30.0”,
“cucumber”: “^5.0.0”,
“cucumber-html-reporter”: “^4.0.1”,
“cucumber-junit”: “^1.7.1”,
“cucumber-pretty”: “^1.4.4”,
“debug”: “^3.1.0”,
“deepmerge”: “^2.1.1”,
“emailjs-imap-client”: “^3.0.7”,
“faker”: “^4.1.0”,
“fecha”: “^2.3.3”,
“geckodriver”: “^1.12.2”,
“jsonschema”: “^1.2.4”,
“lodash”: “^4.17.21”,
“nightwatch”: “^1.0.11”,
“nightwatch-api”: “^0.4.0”,
“npm-run-all”: “^4.1.5”,
“selenium-server”: “^3.12.0”,
“start-server-and-test”: “^1.7.1”,
“ts-node”: “^7.0.1”,
“typescript”: “^2.9.1”,
“wait-on”: “^3.0.1”,
“yargs”: “^11.0.0”
}
}
Create helpers for your tests
Create html report for the test results
Cucumber uses reporter plugins to produce reports that contain information about what scenarios have passed or failed. It produces pretty HTML reports that help in the visualization of failed and passed tests.
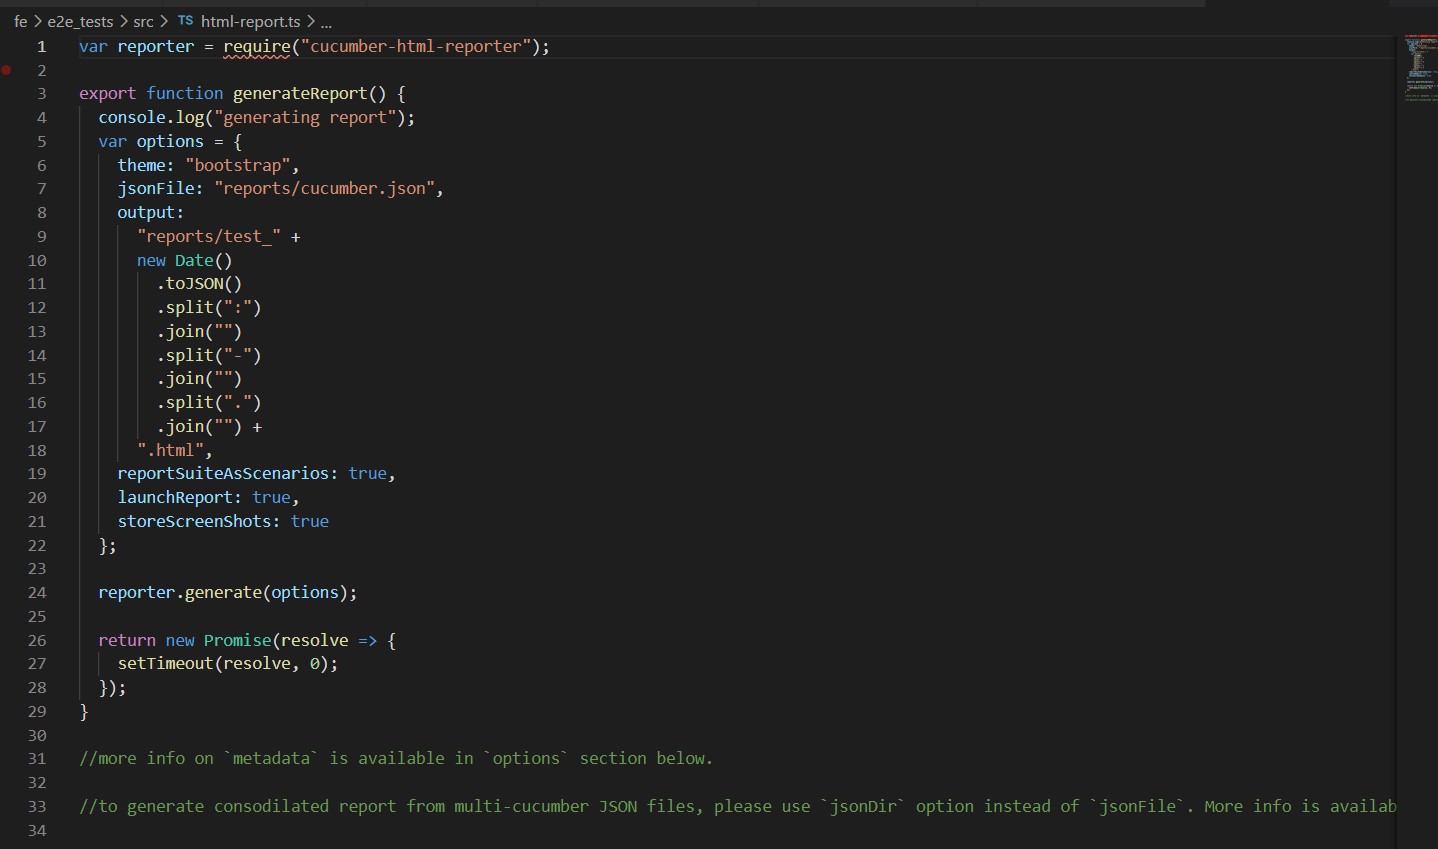
html-reports.ts
var reporter = require(“cucumber-html-reporter”);
export function generateReport( ) {
console.log(“generating report”);
var options = {
theme: “bootstrap“,
jsonFile: “reports/cucumber.json”,
output:
“reports/test_” +
new Date( )
.toJSON()
.split(“:”)
.join(“”)
.split(“-“)
.join(“”)
.split(“.”)
.join(“”) +
“.html”,
reportSuiteAsScenarios: true,
launchReport: true,
storeScreenShots: true
};
reporter.generate(options);
return new Promise(resolve => {
setTimeout(resolve, 0);
});
}
//more info on `metadata` is available in `options` section below.
//to generate consodilated report from multi-cucumber JSON files, please use `jsonDir` option instead of `jsonFile`. More info is available in `options` section below.
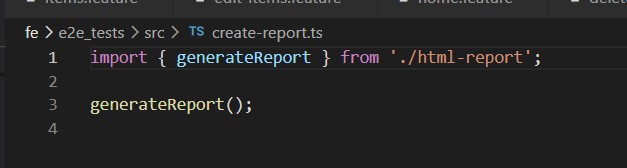
create-reports.ts
import { generateReport } from ‘./html-report’;
generateReport( );
Example of reports can be found here: https://github.com/IT-Labs/backyard/tree/master/doc
E2E test examples with Cucumber and Nightwatch
In this article, we are providing examples of how we can automate some testing scenarios.
We are going to show how we implemented the following scenarios:
- User access tests
- Search list item
- Edit Item
- Create item
- Delete item
- Test empty system
The following diagram is describing our application, where we wanted to simulate a complex application structure that depends on different services and components.
https://github.com/IT-Labs/backyard/blob/master/doc/Backyard%20arch.jpg
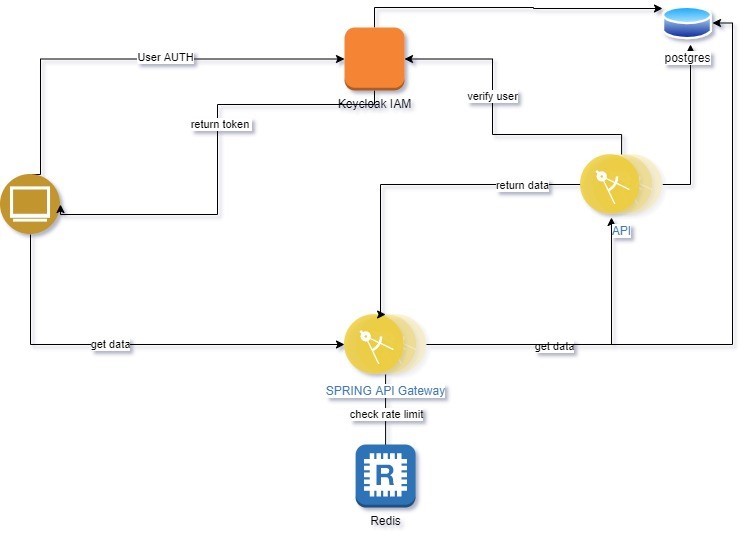
As we discussed in our previous articles, we are using dockers and volumes to run our test in repetitions. All commands are written in shell scripts for an easy start. For example, starting all applications for testing all scenarios you should only run the restart.sh file and system are ready for use, cleaning all resources you should use clean.sh.
Steps:
- Download code from https://github.com/IT-Labs/backyard
- Build the code with the script build.sh
- Start the environment with a restart.sh ./path to your local back yard folder
- Run tests with a test.sh
More details about the commands and environment you can find in the project readme file https://github.com/IT-Labs/backyard/blob/master/README.md.
Here is one example of how to run multiple tests with the previous steps:
https://raw.githubusercontent.com/IT-Labs/backyard/master/doc/TestRun.gif
User access rights
In this example system, we have two types of users: public and administrator users. For testing both scenarios we have two feature files, https://github.com/IT-Labs/backyard/blob/master/fe/e2e_tests/src/features/home/home.feature and https://github.com/IT-Labs/backyard/blob/master/fe/e2e_tests/src/features/home/home-public.feature .
Here is how gherkin is written:
Scenario Outline: Verify menu items from Home page when user is admin
Then the menu <Link> should be <isVisible>
Examples:
| Link | isVisible |
| Home | true |
| Admin | true |
| About | true |
| Hi Username | true |
| Login | false |
| Logout | true |
Code:
Then(/^the menu (.*) should be (.*)$/, function (link:string,isVisible:boolean) {
return menu.checkLinkVisibility(link, isVisible);
});
Code related to this example https://github.com/IT-Labs/backyard/blob/master/fe/e2e_tests/src/features/home/home-steps.ts , https://github.com/IT-Labs/backyard/blob/master/fe/e2e_tests/src/domain/menu/menuPage.ts
Example run: https://github.com/IT-Labs/backyard/blob/master/doc/featureHomeAdminRun.gif
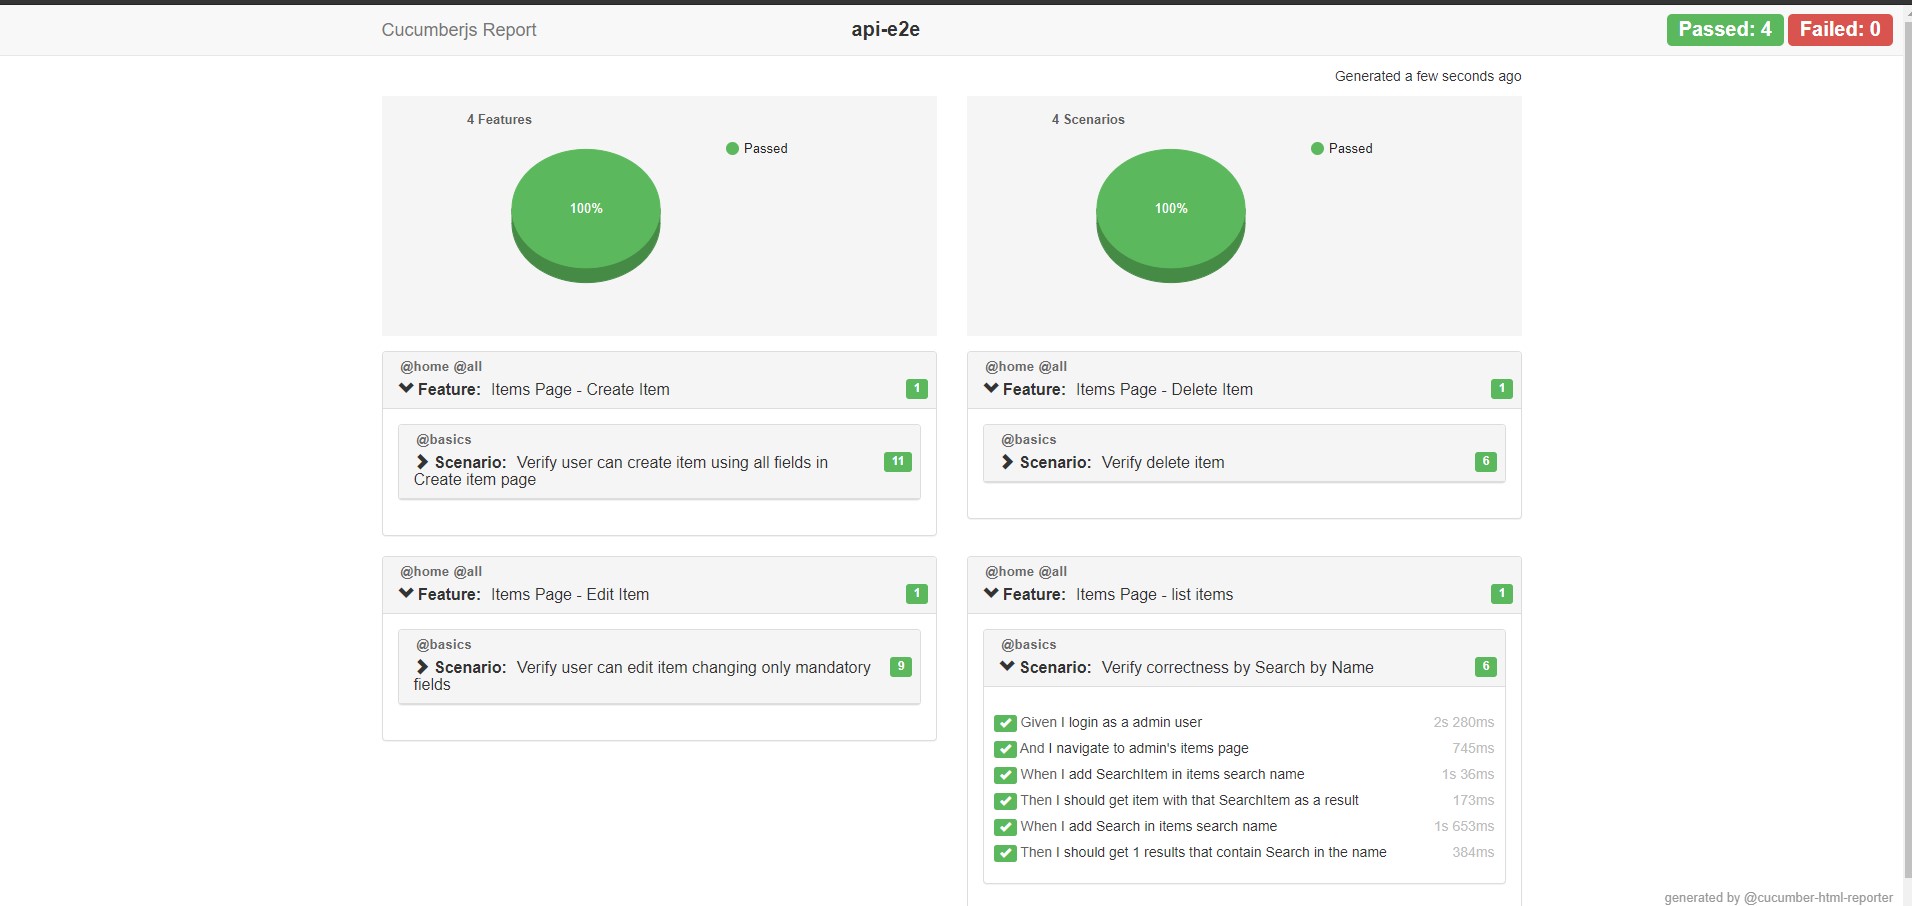
Search list item
For this example, we prepare one scenario, where we are going to validate the search by name. For that purpose, our volume data has already populated data.
Code can be found here: https://github.com/IT-Labs/backyard/blob/master/fe/e2e_tests/src/features/items/items.feature
https://github.com/IT-Labs/backyard/blob/master/fe/e2e_tests/src/domain/items/itemsPage.ts
Scenario: Verify correctness by Search by Name
When I add SearchItem in items search name
Then I should get item with that SearchItem as a result
When I add Search in items search name
Then I should get 1 results that contain Search in the name
Example from the run https://raw.githubusercontent.com/IT-Labs/backyard/master/doc/SearchItem.gif
Delete item
In this example, we are presenting how we can test deletion of one item from out test environment. For that purpose, our volume data has already populated data. We must be aware that for each test run we must restore the volume from initial backup.
Code can be found here: https://github.com/IT-Labs/backyard/blob/master/fe/e2e_tests/src/features/items/delete-items.feature
https://github.com/IT-Labs/backyard/blob/master/fe/e2e_tests/src/domain/items/itemsPage.ts
Scenario: Verify delete item
When I click on Delete icon for item with name DeleteItem
Then I should see delete confirmation modal
When I click on OK on the modal
Then Item with name DeleteItem is not shown on items page
Example from the run: https://github.com/IT-Labs/backyard/blob/master/doc/DeleteItem.gif
Create item
In this example, we are presenting how we can test creating an item. For this test requirements are the item not exist in the system, and for that purpose our database before each run is restored from initial backup.
Scenario: Verify user can create item using all fields in Create item page
When I click on create button
Then I should see create item page
When I add Name SampleName
And I add Description SampleDescription
And I select Status
And I check Is Public checkbox
And click create item
Then Item should be created
And I should be redirected on list items page
Code can be found here: https://github.com/IT-Labs/backyard/blob/master/fe/e2e_tests/src/features/items/create-items.feature
https://github.com/IT-Labs/backyard/blob/master/fe/e2e_tests/src/domain/items/itemFormPage.ts
Example from the run: https://github.com/IT-Labs/backyard/blob/master/doc/CreateItem.gif
Edit item
In this example, we are presenting how we can test deletion of one item from our test environment. For that purpose, our volume data has already populated data. We must be aware that for each test run, we must restore the volume from initial backup.
Code can be found here: https://github.com/IT-Labs/backyard/blob/master/fe/e2e_tests/src/features/items/edit-items.feature
https://github.com/IT-Labs/backyard/blob/master/fe/e2e_tests/src/domain/items/itemsPage.ts
Scenario: Verify user can edit item changing only mandatory fields
When I click to edit item with name EditItem
Then I should see edit item page
When I change the Name to TestEditedItemName
And click create item
Then I should be redirected on list items page
And I add TestEditedItemName in items search name
And I should get item with that TestEditedItemName as a result
Example from the run: https://github.com/IT-Labs/backyard/blob/master/doc/EditItem.gif
Test Empty system
This is a scenario where we are verifying how the system will behave when there are no records. For that purpose, we have a separate environment where a database is without any record, and we start all service as separate instances.
Code can be found here: https://github.com/IT-Labs/backyard/blob/master/fe/e2e_tests/src/features/home/home-public.feature
https://github.com/IT-Labs/backyard/blob/master/fe/e2e_tests/src/features/home/home-steps.ts
Scenario: Verify Home page main page when there are no public published items
Then I should see message in the middle of the screen: There are no items yet!
Example from the run: https://github.com/IT-Labs/backyard/blob/master/doc/emptySystem.gif
What not to do when writing E2E tests
- Don’t Write Them Without Defining the Reason
- Automated acceptance testing (an encapsulation of customer expectations)?
- Automated regression testing (preventing regression errors)?
- Automation of smoke test flow?
- Don’t Duplicate Coverage
- If the flow can be covered with unit test, don’t write E2E test for it
- Don’t Use a Single-Layer Architecture
- Don’t Use Breakable Selectors
- Don’t Expect Your Suite to Be Maintenance-Free
- Don’t Ignore Flaky Tests
Summary
It is so important to test your software from top to bottom. E2E testing is a great way to do it — you just need to follow some rules that will implement the process properly.
When you write the tests, add a descriptive test step. A descriptive test step is helpful when a test fails, it gives them a clean and readable description of test steps (for example why this test, how it is done, etc.). Also, descriptive tests simplify the process of automation test maintenance in large projects. What’s more, having reports that will visualize and tell you which test failed and which test passed is will also help.
Since our approach implements feature files, you need to keep into consideration that the feature files can easily become very large and messy files. And running the tests — especially if they are part of some CI/CD process — can take considerable time, especially when you want to run your test in different browsers and you have large coverage.
On the other hand, large coverage is always good to have no matter the duration of the tests, because it creates greater confidence in your code.
Jovica Krstevski
Technical Lead at IT Labs
Aleksandra Angelovska
Quality Assurance Lead at IT Labs
June 2021